KubeSphere is a free, open-source Kubernetes platform recognized by CNCF, designed for cloud-native application management. It’s an enterprise-grade solution crafted for hybrid multi-cloud deployment, offering full-stack automated IT operations and intuitive DevOps workflows by default. Whether deploying to an existing Kubernetes cluster or starting with fresh Linux distributions, KubeSphere—alongside KubeKey, a command-line tool for seamless cluster deployment, updating, and scaling—simplifies the process.
Boasting an intuitive web UI for managing Kubernetes clusters, KubeSphere integrates pluggable CI/CD tools like Jenkins, facilitating automated CI/CD pipelines. It also offers Source-to-Image (S2I) for creating reproducible container images from source code and Binary-to-Image (B2I) for constructing images from binary files.
This guide will walk you through deploying Kubernetes and KubeSphere on Ubuntu 22.04 servers using KubeKey for an automated setup.
Prerequisites
To follow and complete this tutorial, ensure you have the following:
- Three Ubuntu 22.04 Linux servers—one as the Kubernetes control-plane and two as worker nodes.
- A non-root user with sudo/root administrative privileges.
Setup Hosts and User
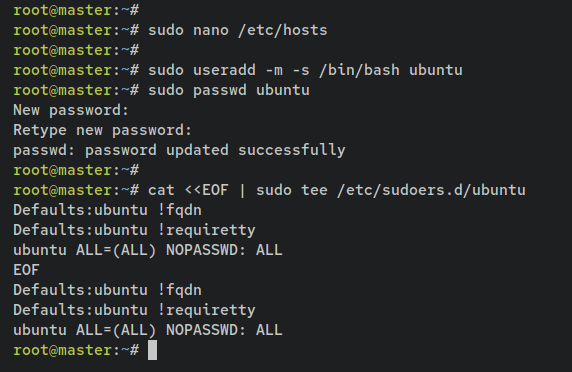
Before proceeding with the installation, configure the /etc/hosts file and create a new user with password-less sudo access on all servers. Execute the following command on all Ubuntu servers:
Edit the /etc/hosts file using the nano editor:
sudo nano /etc/hosts
Add the server IP addresses and host names:
192.168.5.35    master    master
192.168.5.121  node1     node1
192.168.5.122  node2     node2
Save the file and close the editor.
Create a new user named ‘ubuntu’ and set its password:
sudo useradd -m -s /bin/bash ubuntu
sudo passwd ubuntu
Allow the ‘ubuntu’ user to execute sudo commands without a password by running:
cat <
After setting up /etc/hosts and creating the ‘ubuntu’ user, proceed to configure password-less SSH authentication for this user.

Setting Up SSH Key-Based Authentication
Here, you’ll configure password-less SSH authentication for the ‘ubuntu’ user. This setup is initiated from the ‘master’ server, and the installation will automatically proceed to ‘node1’ and ‘node2’.
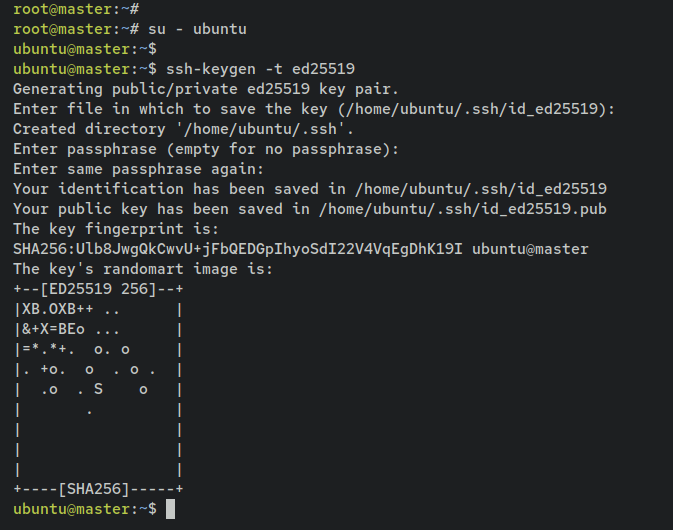
On the ‘master’ server, switch to the ‘ubuntu’ user and generate an SSH key pair:
su - ubuntu
ssh-keygen -t ed25519

Copy the SSH public key to all nodes:
ssh-copy-id ubuntu@master
ssh-copy-id ubuntu@node1
ssh-copy-id ubuntu@node2
Accept the SSH fingerprint and enter the ‘ubuntu’ user’s password when prompted. You should see a message indicating a key was added successfully.
Installing Dependencies
Log in to each server using the ‘ubuntu’ user to ensure password-less authentication is working, and install vital package dependencies for Kubernetes and KubeSphere.
On the ‘master‘ server, update the Ubuntu package index and install dependencies:
sudo apt update
sudo apt install curl socat conntrack ebtables ipset
ssh-keyscan -H master >> ~/.ssh/known_hosts
Downloading KubeKey on Master Node
Download the KubeKey binary to the ‘master’ server. KubeKey facilitates Kubernetes cluster deployment with features like cloud-native add-ons and high availability.
Download the KubeKey binary:
curl -sfL https://get-kk.kubesphere.io | VERSION=v3.0.2 sh -
Create Kubernetes and KubeSphere Deployment Configuration
Generate a YAML configuration for multi-node Kubernetes and KubeSphere deployment:
Execute the following command to generate a configuration script:
./kk create config -f deployment-kubesphere.yml --with-kubernetes v1.24.2 --with-kubesphere v3.3.1
Deploying Kubernetes and KubeSphere
Deploy Kubernetes and KubeSphere using the following command:
./kk create cluster -f deployment-kubesphere.yml
Deploying Pods to Kubernetes and KubeSphere
Deploy an Nginx pod to test your setup:
Create a new deployment and service for Nginx:
kubectl create deployment nginx --image=nginx:alpine --replicas=2
kubectl create service nodeport nginx --tcp=80:80
Conclusion
In this guide, you’ve deployed a Kubernetes cluster with KubeSphere on multiple Ubuntu servers using KubeKey. Additionally, you’ve become familiar with basic Kubernetes and KubeSphere functionalities.
FAQ
- What is KubeSphere?
KubeSphere is an open-source platform for cloud-native application management, offering enterprise-grade features for Kubernetes deployments. - Why use KubeKey?
KubeKey simplifies the deployment, updating, and scaling of Kubernetes clusters and is particularly beneficial in hybrid multi-cloud environments. - Can KubeSphere integrate with other CI/CD tools?
Yes, KubeSphere integrates with tools like Jenkins, facilitating automated CI/CD pipelines. - How do I access the KubeSphere dashboard?
Access the KubeSphere dashboard by visiting the ‘master’ server’s IP followed by port 30880 in your web browser. - What are the prerequisites for setting up a Kubernetes cluster with KubeSphere?
You need three Ubuntu 22.04 servers, with one set as the control-plane, two as worker nodes, and an account with sudo privileges.
