AWX is an open-source web application offering a user interface, REST API, and task engine for Ansible. It serves as the open-source version of Ansible Tower, enabling users to manage Ansible playbooks, inventories, and schedule jobs via its web interface.
In this tutorial, we will explore the fundamental usages of Ansible AWX. To follow along, you’ll need a server that has Ansible AWX installed. We will cover essential configurations such as setting up credentials, inventories, job templates, and more.
Prerequisites
- 2 or 3 servers
- 10.5.5.20 ansible-awx
- 10.5.5.21 lemp
- Basic understanding of Ansible
- Root privileges
What We Will Do:
- Environment Setup and Configuration
- Setup Credentials
- Setup Inventories
- Setup Projects
- Setup Job Templates
- Run Jobs
Step 1 – Environment Setup and Configuration
We will deploy and execute an Ansible playbook for basic LEMP installation using the Ansible AWX dashboard. Two servers are needed: one for AWX and the other as the target.
    10.5.5.20   ansible-awx
    10.5.5.21   lemp
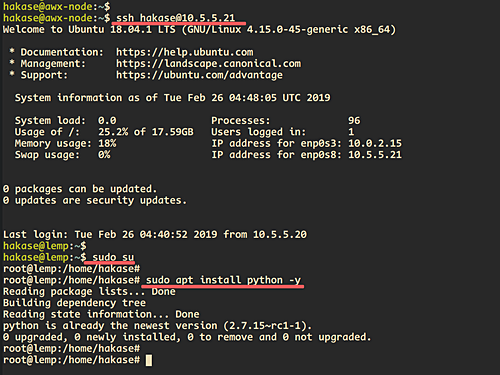
We will deploy the playbook using a user called ‘hakase’, employing key-based SSH authentication. Ensure that the user and key-based authentication are set up on the ‘lemp’ machine.
From the ‘ansible-awx‘ server, test the setup with:
    su - hakase
    ssh hakase@10.5.5.21
Ensure you’re logged in without entering a password. ‘Hakase’ must access root privileges without a password for running tasks. On the ‘lemp‘ target machine, execute the following command:
    su - hakase
    sudo su
Ensure root privileges are granted without a password. Install the necessary Python packages on all target machines managed by Ansible:
sudo apt install python -y
Step 2 – Setup Credentials
Configure Ansible AWX Credentials to authenticate tasks against managed servers, synchronize inventory sources, and import projects. Ansible AWX supports various credentials including SSH, AWS, GCE, and more.
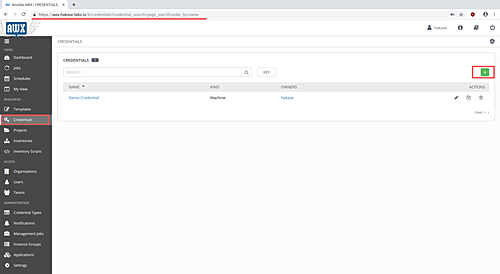
To set up credentials, navigate to the ‘Credentials‘ menu, and click the ‘+’ button.
Enter the ‘NAME‘ and ‘DESCRIPTION‘ of the credentials, and choose ‘Machine‘ as the ‘CREDENTIAL TYPE‘.
The ‘Machine’ credential allows SSH authentication for server management, supporting both password and key-based authentications. For this guide, use key-based authentication, specifying the username and pasting the private keys for that user.
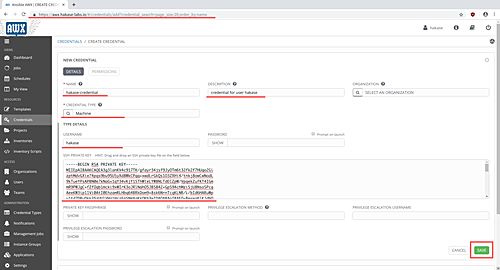
Click the ‘SAVE‘ button to finalize.

Step 3 – Setup Inventories
Inventories are collections of host servers managed by Ansible AWX. They allow creating groups to facilitate managing and provisioning servers across various environments.
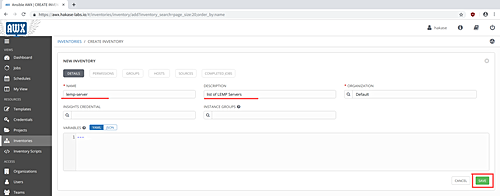
To create a new inventory group and add server hosts, click the ‘Inventories‘ menu, and select the ‘+’ button, then choose ‘Inventory’.
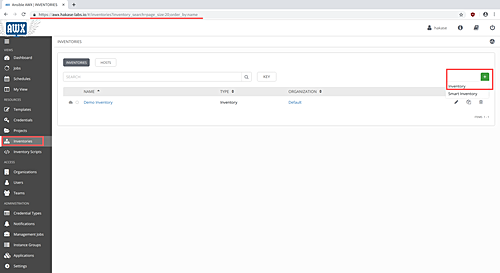
Enter the ‘NAME‘ and ‘DESCRIPTION‘ of the inventory, and click ‘SAVE‘.
Under the ‘HOSTS‘ tab, click ‘+‘ to add new hosts, providing ‘HOST NAME‘, ‘DESCRIPTION‘, and ‘VARIABLES‘, including the IP address configuration (‘ansible_host: 10.5.5.21’).
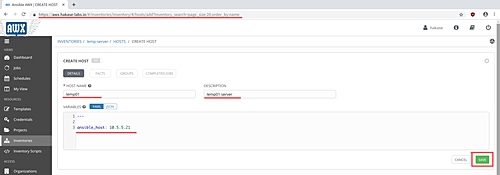
Click ‘SAVE‘ to add the host.
Verify host configuration by selecting the host and clicking ‘RUN COMMANDS‘, then choosing the ‘MODULE‘ ‘ping‘. Select your ‘MACHINE CREDENTIAL‘ and click ‘LAUNCH‘ to confirm.
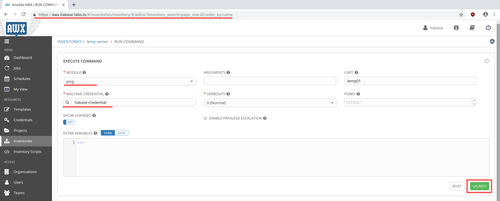
Once configured, a new inventory will be created and the target machine is added successfully.
Step 4 – Setup Projects
Projects in AWX represent collections of Ansible Playbooks, manageable through local directories or SCM systems like Git. To create a new project, click ‘Projects‘, then ‘+’.
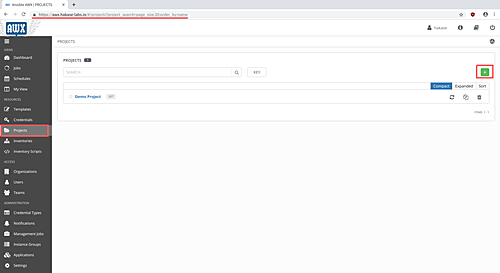
Enter the project’s ‘NAME‘ and ‘DESCRIPTION‘, choose ‘SCM TYPE‘ as ‘Git‘, and provide the repository URL.
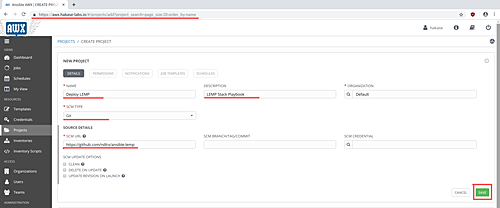
Click ‘SAVE‘ to create the project.
It’s also possible to create projects manually by adding a playbooks directory under ‘/var/lib/awx/projects‘ if using AWX Docker with ‘project_data_dir‘ enabled.
Step 5 – Create New Job Templates
Job templates define the execution of Ansible playbooks. To create or execute a template, choose the relevant ‘Project’, ‘Credentials’, and ‘Inventory’. We already have these setups, so navigate to ‘Templates‘, click ‘+’, and select ‘Job template‘.
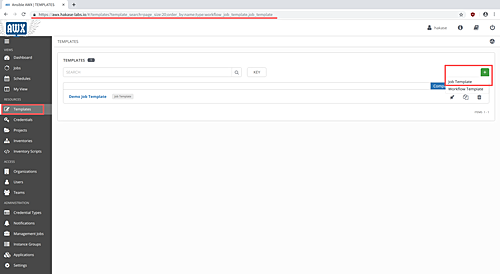
Enter ‘NAME‘ and ‘DESCRIPTION‘ for the job. Select the appropriate ‘INVENTORY‘, ‘CREDENTIAL‘, and ‘PROJECT‘. Then specify the ‘PLAYBOOK‘ to deploy.
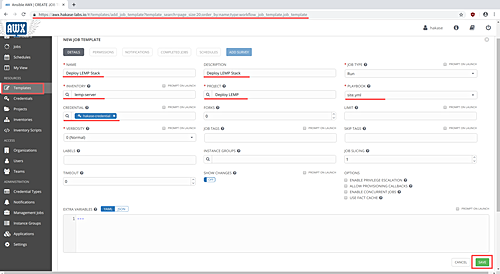
Once complete, the new job template for Ansible AWX is created.
Step 6 – Run the Job Template
To execute a job template and deploy playbooks to target hosts, access the ‘Templates‘ and locate available job templates.

Upon completion, you will see a green indicator next to the job template name.

Click the green sign to view the detailed result of the job. Successful execution will confirm the LEMP stack installation on the target machine via Ansible AWX.
Step 7 – Testing Target Machine
Test the domain name configuration stored in ‘roles/web/vars/main.yml‘. Verify Nginx and PHP-FPM services using the following:
    systemctl status nginx
    systemctl status php7.2-fpm
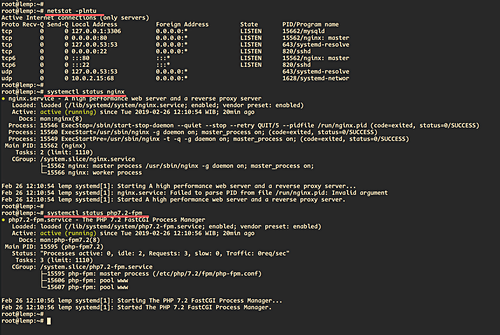
Similarly, verify the MySQL setup, with configurations found in ‘roles/db/vars/main.yml’.
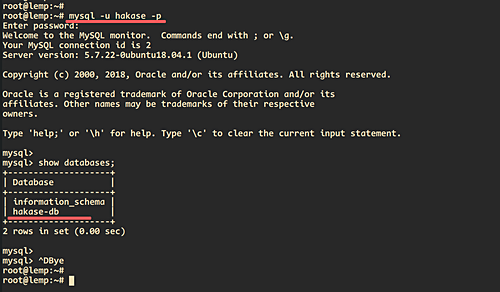
As a result of this tutorial, a LEMP Stack is successfully installed on the target machine via Ansible AWX.
Reference
Frequently Asked Questions
What is AWX used for?
AWX provides a web interface, REST API, and task engine for Ansible, facilitating the management of playbooks, inventories, and scheduled jobs.
What are the prerequisites to use Ansible AWX?
You need a few servers, basic understanding of Ansible, and root privileges.
Where can I refer to if I have more questions regarding Ansible AWX?
Visit the Ansible Tower user guide for comprehensive information.
