Nginx (pronounced “engine x”) is a free, open-source, high-performance HTTP server known for its stability, rich feature set, and low resource consumption. This guide provides a step-by-step process to install Nginx on an Ubuntu 18.04 LTS server with PHP 7.2 and MySQL support, collectively referred to as the LEMP stack (Linux + Nginx + MySQL + PHP).
Prerequisites
- Ubuntu 18.04 LTS Server
- Root privileges
Overview of Steps
- Install Nginx
- Install MySQL
- Install PHP-FPM
- Configure Nginx and PHP-FPM
- Install PhpMyAdmin
- Configure PhpMyAdmin
- Testing
Step 1 – Install Nginx
Nginx is a high-performance HTTP and proxy server with low memory consumption, utilized by large-scale websites like Netflix and GitHub.
Run the following command to install Nginx.
sudo apt install nginx -y
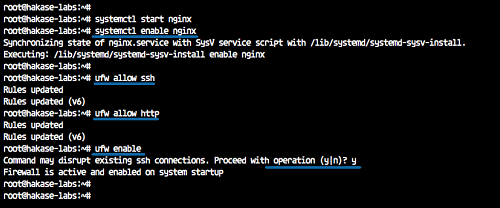
Start the Nginx service and enable it on boot.
systemctl start nginx
systemctl enable nginx
The Nginx installation is now complete.
Configure the Firewall
Enable your server’s firewall, allowing SSH and HTTP traffic:
ufw allow ssh
ufw allow http
ufw enable
Your Nginx server is now running under the UFW firewall.

Step 2 – Install MySQL
MySQL is a popular open-source Relational Database Management System.
Use the following command to install MySQL:
sudo apt install mysql-server mysql-client -y
Start MySQL and enable it on boot:
systemctl start mysql
systemctl enable mysql

Step 3 – Install PHP-FPM
PHP-FPM (FastCGI Process Manager) is an alternative to PHP FastCGI, offering additional features and speed improvements.
Install PHP7.2-FPM with additional required extensions:
sudo apt install php7.2 php7.2-fpm php7.2-cli php7.2-curl php7.2-mysql php7.2-curl php7.2-gd php7.2-mbstring php-pear -y
Enable PHP-FPM on boot:
systemctl start php7.2-fpm
systemctl enable php7.2-fpm
netstat -pl | grep php

Step 4 – Configure Nginx and PHP-FPM
Configure Nginx
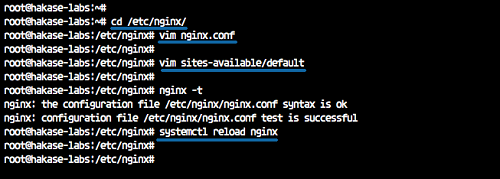
To configure Nginx, navigate to the ‘/etc/nginx’ directory and edit the ‘nginx.conf’ file:
cd /etc/nginx/
vim nginx.conf
Uncomment these lines:
keepalive_timeout 2;
server_tokens off;
Edit the default virtual host file.
vim sites-available/default
Update the PHP line as shown:
location ~ \.php$ {
    include snippets/fastcgi-php.conf;
    fastcgi_pass unix:/var/run/php/php7.2-fpm.sock;
}
Check the configuration and restart Nginx:
nginx -t
systemctl reload nginx

Configure PHP-FPM
Navigate to ‘/etc/php/7.2’ directory and edit ‘php.ini’.
cd /etc/php/7.2/
vim fpm/php.ini
Uncomment and modify:
cgi.fix_pathinfo=0
Reload PHP-FPM:
systemctl reload php7.2-fpm
Step 5 – Install PhpMyAdmin
PhpMyAdmin is a web-based application for managing MySQL databases.
To install PhpMyAdmin:
sudo apt install phpmyadmin -y
During installation, for the web server configuration, choose ‘None’ and select ‘Yes’ for database configuration.
Set a strong password like ‘Hakaselabs001@#’ and repeat it.
Step 6 – Configure PhpMyAdmin
Configure PhpMyAdmin with Nginx
Add PhpMyAdmin configuration to Nginx’s virtual host configuration file:
cd /etc/nginx/
vim sites-available/default
Include the following configuration inside the ‘server {…}’ bracket:
location /phpmyadmin {
    root /usr/share/;
    index index.php;
    try_files $uri $uri/ =404;
location ~ ^/phpmyadmin/(doc|sql|setup)/ {
deny all;
}
location ~ /phpmyadmin/(.+\.php)$ {
fastcgi_pass unix:/var/run/php/php7.2-fpm.sock;
fastcgi_param SCRIPT_FILENAME $document_root$fastcgi_script_name;
include fastcgi_params;
include snippets/fastcgi-php.conf;
}
Save, test Nginx configuration, and reload the service:
nginx -t
systemctl reload nginx
Configure MySQL User for PhpMyAdmin
Create a non-root MySQL user for PhpMyAdmin:
mysql -u root -p
create user hakase@'localhost' identified by 'Hakaselabs001@#';
grant all privileges on *.* to hakase@'localhost' identified by 'Hakaselabs001@#';
flush privileges;
exit;
Step 7 – Testing
Test PHP Files
Create a PHP info file in the web-root directory.
cd /var/www/html/
vim info.php
<?php
phpinfo();
?>
Access the info page in a browser:
http://192.168.33.10/info.php
Test Login to PhpMyAdmin
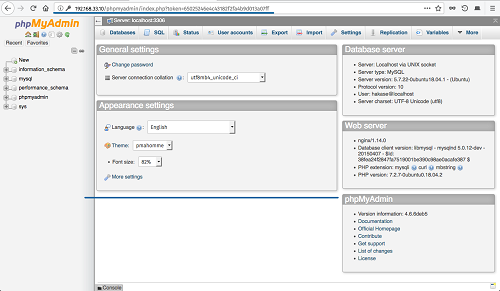
Access your PhpMyAdmin instance:
http://192.168.33.10/phpmyadmin/
Login with user ‘hakase’ and password ‘Hakaselabs001@#’.

The LEMP Stack and PhpMyAdmin are successfully installed on Ubuntu 18.04 LTS.
FAQ
Q: Can I install a different version of PHP?
A: Yes, you can install other PHP versions by changing the package name in the apt commands.
Q: How can I secure PhpMyAdmin?
A: It’s recommended to set up password protection, limit access using IPs, or set up two-factor authentication.
Q: Why did I choose ‘None’ during PhpMyAdmin installation?
A: Since we are using Nginx, selecting ‘None’ prevents PhpMyAdmin from trying to configure Apache.
Q: What should I do if I forget the PhpMyAdmin password?
A: You can reset it by accessing the MySQL shell as root and updating the user’s password.
