CockroachDB is a sophisticated open-source, cloud-native SQL database developed by Cockroach Labs. It’s renowned for being a distributed database, built upon transactional and key-value store technology. Notably, CockroachDB is a scalable SQL solution akin to Google’s Spanner database, using the PostgreSQL wire protocol for seamless integration and is optimized for production environments.
This tutorial will guide you through setting up a secure CockroachDB cluster on Ubuntu 18.04. You’ll learn how to configure a secure cluster, access the CockroachDB admin dashboard, create a new user, and manage databases within CockroachDB.
Prerequisites
To set up the CockroachDB cluster, you’ll need multiple servers. This guide will utilize three Ubuntu 18.04 servers with the following hostnames and IP addresses:
    node1    10.5.5.21
    node2    10.5.5.22
    node3    10.5.5.23
Steps Overview
- Set up NTP Server with Chrony
- Download and Install CockroachDB
- Create Certificates
- Initialize CockroachDB Cluster
- Add Nodes to the CockroachDB Cluster
- Testing
Step 1 – Setup NTP Server with Chrony
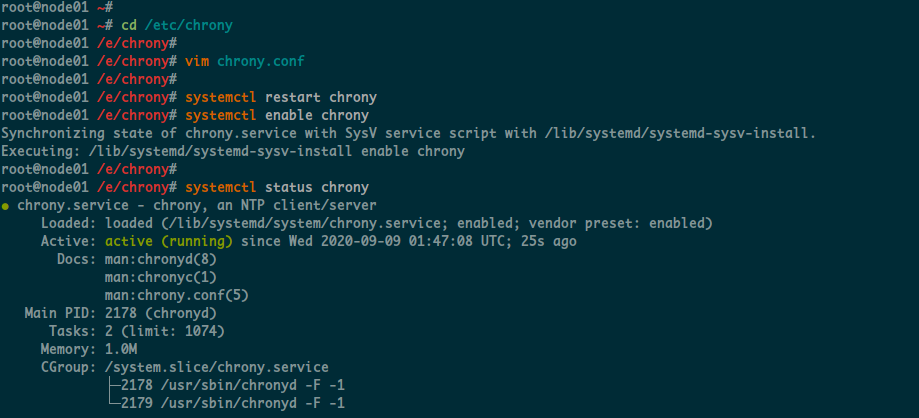
Synchronized time is crucial in a clustered environment. We’ll use Chrony for NTP services across all servers. Install the Chrony package on each server with the command below.
sudo apt install chrony -y
Next, configure the NTP settings. Navigate to the Chrony configuration directory and edit the chrony.conf file.
cd /etc/chrony/
vim chrony.conf
Replace the default NTP pool with your country’s pool.
    pool 0.id.pool.ntp.org iburst maxsources 4
    pool 1.id.pool.ntp.org iburst maxsources 1
    pool 2.id.pool.ntp.org iburst maxsources 1
    pool 3.id.pool.ntp.org iburst maxsources 2
Save the changes and restart the Chrony service, ensuring it starts on boot.
    systemctl restart chrony
    systemctl enable chrony

Step 2 – Download and Install CockroachDB
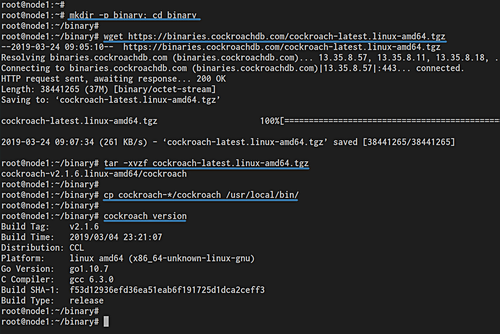
Proceed to download and install CockroachDB on each server. Create a directory for the binary files and move into it.
    mkdir -p binary
    cd binary
Download and extract the CockroachDB binaries.
    wget https://binaries.cockroachdb.com/cockroach-latest.linux-amd64.tgz
    tar -xvzf cockroach-latest.linux-amd64.tgz
Move the CockroachDB binary to /usr/local/bin for global access.
cp cockroach-*/cockroach /usr/local/bin/
You can verify the installation by checking the version with the following command.
cockroach version

Step 3 – Create Certificates
Secure your CockroachDB cluster by generating required certificates using CockroachDB’s built-in tool. Begin by setting up the directory for certificates and an environment variable.
    mkdir -p ${HOME}/.cockroach-certs/
    export COCKROACH_CERTS_DIR='${HOME}/.cockroach-certs/'
Create CA and Distribute to Nodes
On node1, create a Certificate Authority (CA).
    cockroach cert create-ca \\
    --certs-dir=$COCKROACH_CERTS_DIR \\
    --ca-key=$COCKROACH_CERTS_DIR/ca.key
Transfer the CA certificate and key to all nodes using secure copy.
    scp ~/.cockroach-certs/ca.crt ~/.cockroach-certs/ca.key root@10.5.5.22:~/.cockroach-certs/
    scp ~/.cockroach-certs/ca.crt ~/.cockroach-certs/ca.key root@10.5.5.23:~/.cockroach-certs/
Create Client and Server Certificates
Follow similar steps to create client and server certificates for each node, ensuring inter-node security within the cluster. Refer to the node-specific server certificate creation commands in the article.
Step 4 – Initialize and Start Secure CockroachDB Cluster
Start by initializing the cluster from node1.
    cockroach start \\
    --background --certs-dir=$COCKROACH_CERTS_DIR \\
    --advertise-host=10.5.5.21 --listen-addr=10.5.5.21
Confirm no errors occurred, then check the node status.
cockroach node status --host=10.5.5.21
Step 5 – Add Nodes to the Cluster
Add node2 and node3 to the cluster, ensuring they have server and CA certificates in place.
    cockroach start \\
    --background --certs-dir=$COCKROACH_CERTS_DIR \\
    --advertise-host=10.5.5.22 --listen-addr=10.5.5.22 \\
    --join=10.5.5.21:26257

    cockroach start \\
    --background --certs-dir=$COCKROACH_CERTS_DIR \\
    --advertise-host=10.5.5.23 --listen-addr=10.5.5.23 \\
    --join=10.5.5.21:26257
Verify the nodes’ statuses from node1.
Step 6 – Testing the CockroachDB Cluster
Accessing the CockroachDB Dashboard
CockroachDB features a user-friendly dashboard to manage and monitor the cluster. Access it via https://10.5.5.21:8080/. First, create a database user for dashboard access:
    cockroach sql --certs-dir=$COCKROACH_CERTS_DIR \\
    --host=10.5.5.21

    CREATE USER hakase WITH PASSWORD 'hakase-labs123@#';
Verify Database Replication
Test the CockroachDB cluster’s replication capabilities by creating databases on node1 and verifying their presence on other nodes.
show databases;
Having followed these steps, your secure CockroachDB cluster is up and running under Ubuntu 18.04!
FAQs
- What does CockroachDB offer as a distributed database?
CockroachDB provides scalable, distributed SQL database capabilities with cloud-native resilience and easy scalability akin to Google Spanner. - Why use Chrony for time synchronization?
Chrony offers excellent time synchronization capabilities, even in virtualized or complex network environments, ensuring cluster nodes are accurately synchronized. - Can I use a different OS than Ubuntu 18.04 for this setup?
Yes, CockroachDB supports multiple operating systems, though the commands and instructions might vary slightly. - What is the significance of certificates in CockroachDB?
Certificates secure communication within the cluster, protecting data integrity and ensuring authorized connectivity only. - How can I verify if my cluster setup was successful?
Checking nodes’ statuses usingcockroach node statusand ensuring that the database replication works are key steps to confirm a successful setup.
