Python is a widely-used open-source and object-oriented interpreted programming language. Anaconda is a comprehensive platform for Python, R, Data Science, and machine learning, and acts as a package manager. It features over 1,500 open source packages and provides free community support; with more than 15 million users globally, it’s a go-to choice for many developers.
This guide provides a step-by-step tutorial on installing and using the Anaconda Python Distribution on Debian 11.
Prerequisites
- A server running Debian 11.
- Root or administrative access configured on the server.
Installing Anaconda
The most straightforward method for installing Anaconda is by downloading its installer bash script. Start by visiting the Anaconda download page, select the latest version, and use the following command to download it to your system:
wget https://repo.anaconda.com/archive/Anaconda3-2021.05-Linux-x86_64.sh
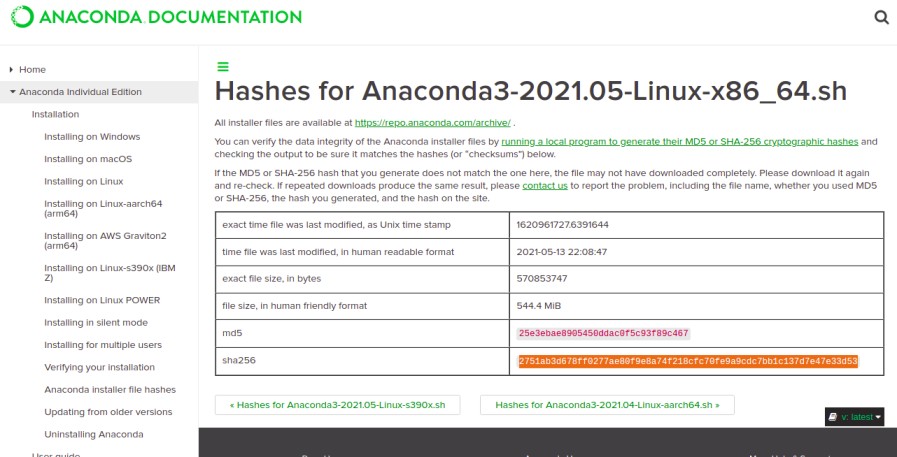
After downloading, ensure the integrity of the installer via this command:
sha256sum Anaconda3-2021.05-Linux-x86_64.sh
The expected output is:
2751ab3d678ff0277ae80f9e8a74f218cfc70fe9a9cdc7bb1c137d7e47e33d53 Anaconda3-2021.05-Linux-x86_64.sh
Cross-reference the output with the hash values available on the Anaconda documentation page.

After verifying the hash, begin installation with:
bash Anaconda3-2021.05-Linux-x86_64.sh
You will encounter the license agreement prompt:
Welcome to Anaconda3 2021.05
In order to continue the installation process, please review the license agreement.
Please, press ENTER to continue
>>>
===================================
Do you accept the license terms? [yes|no]
>>> yes
Enter Yes to accept the license and continue. You’ll then need to specify the installation location:
Anaconda3 will now be installed into this location:
/root/anaconda3
  - Press ENTER to confirm the location
  - Press CTRL-C to abort the installation
  - Or specify a different location below
[/root/anaconda3] >>>
Press Enter to proceed with the default location. You’ll then be asked if you wish to initialize Anaconda:
Preparing transaction: done
Executing transaction: done
installation finished.
Do you wish the installer to initialize Anaconda3
by running conda init? [yes|no]
[no] >>> yes
Type yes to complete setup. After installation, you will see:
no change     /root/anaconda3/condabin/conda
no change     /root/anaconda3/bin/conda
...
modified      /root/.bashrc

==> For changes to take effect, close and re-open your current shell. <==

If you'd prefer that conda's base environment not be activated on startup, set the auto_activate_base parameter to false:

conda config --set auto_activate_base false

Thank you for installing Anaconda3!
Activate Anaconda using the command:
source ~/.bashrc
You should see:
(base) root@debian11:~#
Verify the Anaconda version with:
(base) root@debian11:~# conda info
Output example:
active environment : base
active env location : /root/anaconda3
...
Using Anaconda
Anaconda includes the conda utility for Python package management.
To list available packages, execute:
(base) root@debian11:~# conda list
Sample output:
# packages in environment at /root/anaconda3:
# Name                    Version                   Build  Channel
...
To update Anaconda, use:
(base) root@debian11:~# conda update conda
Expected output:
Collecting package metadata (current_repodata.json): done
Solving environment: done
...
Creating Anaconda Environments
Create isolated environments in Anaconda with different Python versions for project isolation.
Check available Python versions:
(base) root@debian11:~# conda search "^python$"
Create a new environment named myenv with Python 3:
(base) root@debian11:~# conda create --name myenv python=3
Output confirmation:
Proceed ([y]/n)? y
...
Activate your environment:
(base) root@debian11:~# conda activate myenv
Verify the Python version:
(myenv) root@debian11:~# python --version
Expected output:
Python 3.9.6
Deactivate the environment:
(myenv) root@debian11:~# conda deactivate
Output:
(base) root@debian11:~#
List all environments:
(base) root@debian11:~# conda info --envs
Expected output:
# conda environments:
# base                  *  /root/anaconda3
myenv                    /root/anaconda3/envs/myenv
Remove myenv environment:
(base) root@debian11:~# conda env remove -n myenv
Confirmation:
Remove all packages in environment /root/anaconda3/envs/myenv:
Uninstalling Anaconda
To completely uninstall Anaconda, install the anaconda-clean module:
(base) root@debian11:~# conda install anaconda-clean
Once installed, proceed with uninstallation:
(base) root@debian11:~# anaconda-clean
Prompt for confirmation:
Delete .conda? (y/n): y
Remove Anaconda directory:
rm -rf ~/anaconda3
Edit your .bashrc file:
nano ~/.bashrc
Remove the conda-specific configurations:
# >>> conda initialize >>>
...
# <<< conda initialize <<<
Save and close the file after editing.
Conclusion
This guide has detailed the installation of Anaconda on Debian 11, including setting up and managing environments, updating, and uninstalling Anaconda. For any questions, feel free to reach out.
Frequently Asked Questions (FAQ)
- What is Anaconda used for? Anaconda simplifies package management and deployment for Python and R; it’s widely used for scientific computing and data science.
- Is installing Anaconda necessary? While not mandatory, Anaconda can significantly streamline package management and environment configuration for Python projects.
- Can Anaconda handle both Python2 and Python3? Yes, Anaconda can create environments supporting different Python versions, allowing you to work with Python2 and Python3 simultaneously.
- How often should I update Anaconda? Regular updates are recommended to access the latest features and security patches. Keeping dependencies and packages updated also helps avoid compatibility issues.
- Is Anaconda free to use? Yes, Anaconda offers a free version with extensive tools, while additional enterprise features are available through paid subscriptions.
