Zabbix is a robust, open-source monitoring solution designed to oversee IT infrastructure, including networks, servers, virtual machines, and cloud services. It’s developed mainly using C and Java, while the frontend is handled by PHP, offering a web-based interface to track various metrics such as network usage, CPU load, and disk space while also managing notifications based on specific triggers.
Operating on a Client/Server model, Zabbix utilizes agents on different systems to communicate data to the server. For systems lacking an agent, Zabbix can also employ generic monitoring protocols such as Simple Network Management Protocol (SNMP) or Intelligent Platform Management Interface (IPMI).
This tutorial will guide you through installing the Zabbix Server and its client on a Rocky Linux 9 server.
Prerequisites
- Two Rocky Linux 9 servers—one configured as the server and the other as the client you will monitor.
- A non-root user with sudo privileges.
- A Fully Qualified Domain Name (FQDN), such as
zabbix.example.com, set up for your server. - An SMTP account with an email service like Amazon SES or Mailgun.
- Ensure your system is updated:
$ sudo dnf update
- Install essential packages:
$ sudo dnf install wget curl nano unzip yum-utils policycoreutils-python-utils -y
Step 1 – Configure Firewall
Start by configuring the firewall in Rocky Linux, which uses Firewalld. Check the firewall’s status:
$ sudo firewall-cmd --state
Output:
running
To configure the firewall, open necessary ports and services:
$ sudo firewall-cmd --permanent --add-service=http --add-service=https --add-port={10050/tcp,10051/tcp}
Reload the firewall to apply changes:
$ sudo firewall-cmd --reload
Step 2 – Set SELinux to Permissive Mode
Configure SELinux to work in permissive mode. In this mode, SELinux won’t block any process but will log all activities.
$ sudo setenforce 0 && sudo sed -i 's/^SELINUX=.*/SELINUX=permissive/g' /etc/selinux/config
Step 3 – Configure Nginx and PHP Repository
Ensure you have the latest versions of Nginx and PHP before proceeding with the Zabbix installation. Update your repositories:
$ sudo dnf install epel-release -y
$ sudo dnf install https://rpms.remirepo.net/enterprise/remi-release-9.rpm
$ sudo dnf module reset php -y && sudo dnf module enable php:remi-8.2
Step 4 – Install Zabbix Server
Proceed with installing the Zabbix repository and its necessary components:
$ sudo rpm -Uvh https://repo.zabbix.com/zabbix/6.0/rhel/9/x86_64/zabbix-release-6.0-4.el9.noarch.rpm
$ sudo dnf clean all
$ sudo dnf install zabbix-server-pgsql zabbix-web-pgsql zabbix-nginx-conf zabbix-sql-scripts zabbix-selinux-policy zabbix-agent
Step 5 – Install and Configure PostgreSQL
PostgreSQL 16 is recommended. Install and configure PostgreSQL, ensuring it’s running and enabled:
$ sudo dnf install -y https://download.postgresql.org/pub/repos/yum/reporpms/EL-9-x86_64/pgdg-redhat-repo-latest.noarch.rpm
$ sudo dnf -qy module disable postgresql
$ sudo dnf install -y postgresql16-server postgresql16-contrib
$ sudo /usr/pgsql-16/bin/postgresql-16-setup initdb
$ sudo systemctl enable postgresql-16 --now
Step 6 – Configure PHP
Adjust the PHP FPM configuration to match Nginx’s running user:
sudo nano /etc/php-fpm.d/zabbix.conf
user = nginx
group = nginx
$ sudo systemctl enable php-fpm --now
Step 7 – Install SSL
Utilize Certbot with Snapd to apply SSL certificates for secure connections:
$ sudo dnf install -y snapd
$ sudo systemctl enable snapd --now
$ sudo snap install core && sudo snap refresh core
$ sudo ln -s /var/lib/snapd/snap /snap
$ sudo snap install --classic certbot
$ sudo ln -s /snap/bin/certbot /usr/bin/certbot
Step 8 – Configure Nginx
Modify Nginx settings to integrate SSL certificates and enforce secure connections:
$ sudo nano /etc/nginx/conf.d/zabbix.conf
server {
       listen 443 ssl;
       ssl_certificate /etc/letsencrypt/live/zabbix.example.com/fullchain.pem;
       ssl_certificate_key /etc/letsencrypt/live/zabbix.example.com/privkey.pem;
       ...
    }
$ sudo nginx -t
$ sudo systemctl enable nginx --now
Step 9 – Access Zabbix Frontend
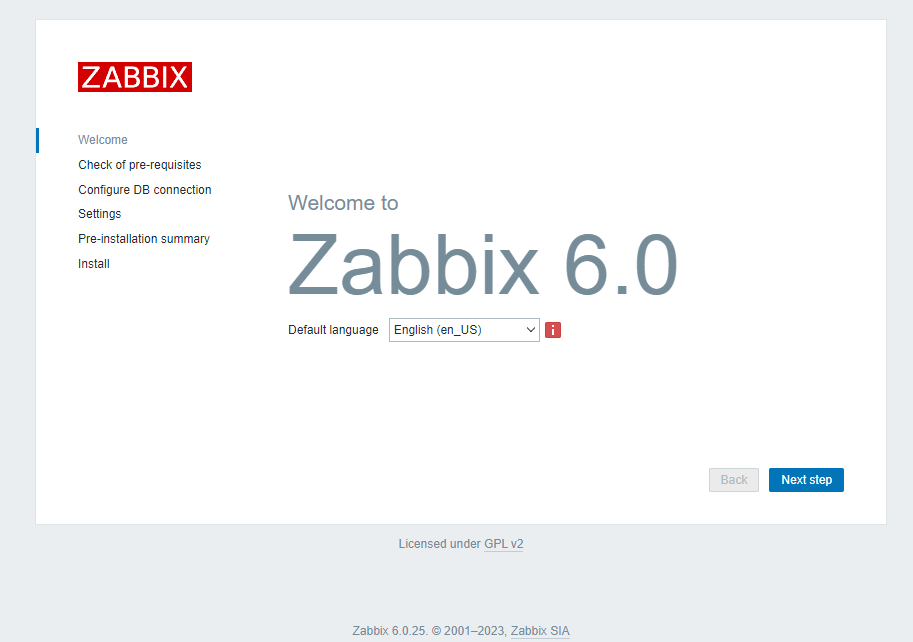
Access the Zabbix frontend by visiting https://zabbix.example.com. Follow the installation wizard to complete the setup.
Step 10 – Configure SELinux
Set up SELinux policies to allow necessary services like HTTPd to interact with Zabbix:
$ sudo setsebool -P httpd_can_connect_zabbix 1
$ sudo setsebool -P httpd_can_network_connect_db 1
Step 11 – Install Zabbix Agent on a Remote System
Step 11.1 – Configure Firewall on Remote System
Open the necessary port for Zabbix agents:
$ sudo firewall-cmd --add-port=10050/tcp --permanent --zone=public
$ sudo firewall-cmd --reload
Step 11.2 – Install Zabbix Agent
Install Zabbix agent on the remote machine and adjust its configuration:
$ sudo rpm -Uvh https://repo.zabbix.com/zabbix/6.0/rhel/9/x86_64/zabbix-release-6.0-4.el9.noarch.rpm
$ sudo dnf install zabbix-agent
Step 11.3 Configure Zabbix Agent
Configure the Zabbix agent to communicate securely using pre-shared keys (PSK):
$ sudo sh -c "openssl rand -hex 32 > /etc/zabbix/zabbix_agentd.psk"
$ sudo nano /etc/zabbix/zabbix_agentd.conf
Server=
ServerActive=
TLSConnect=psk
TLSAccept=psk
TLSPSKIdentity=PSK 001
TLSPSKFile=/etc/zabbix/zabbix_agentd.psk
Step 11.4 – Start Zabbix Agent
Start and enable the Zabbix agent service:
$ sudo systemctl enable zabbix-agent --now
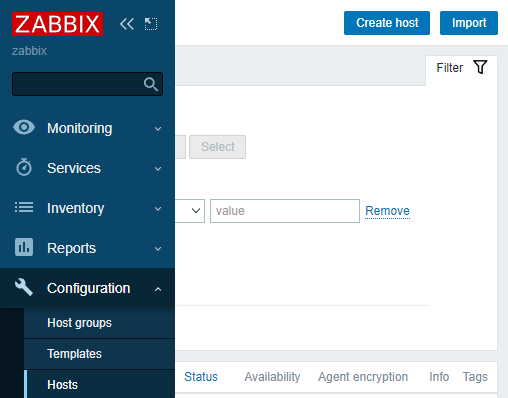
Step 12 – Add Zabbix Client to the Zabbix Frontend for Monitoring
To monitor the remote system, add it to the Zabbix frontend by creating a new host:
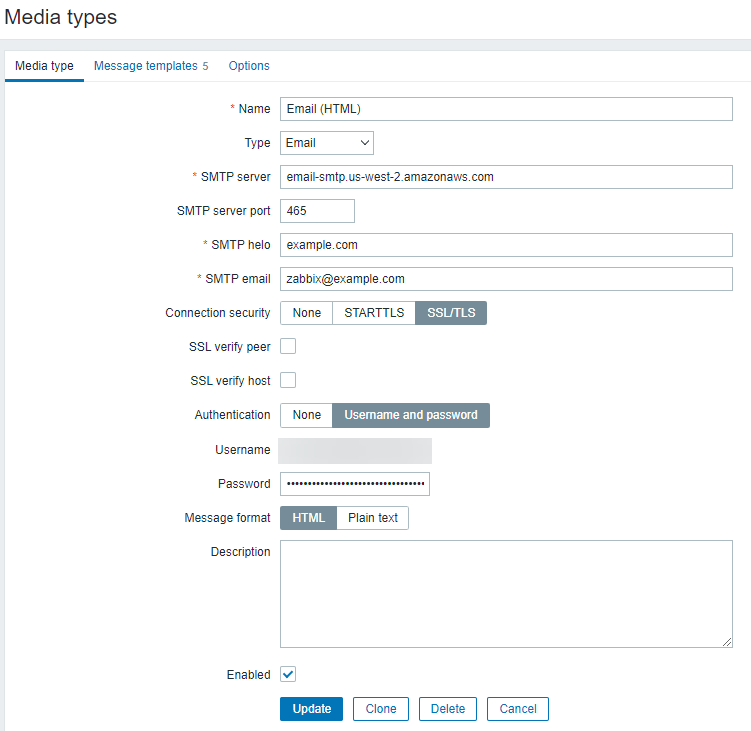
Step 13 – Configure Email Notifications
Set up email notifications in Zabbix to receive alerts:
Step 14 – Create a New User
Create a new user for better security and enable email notifications:
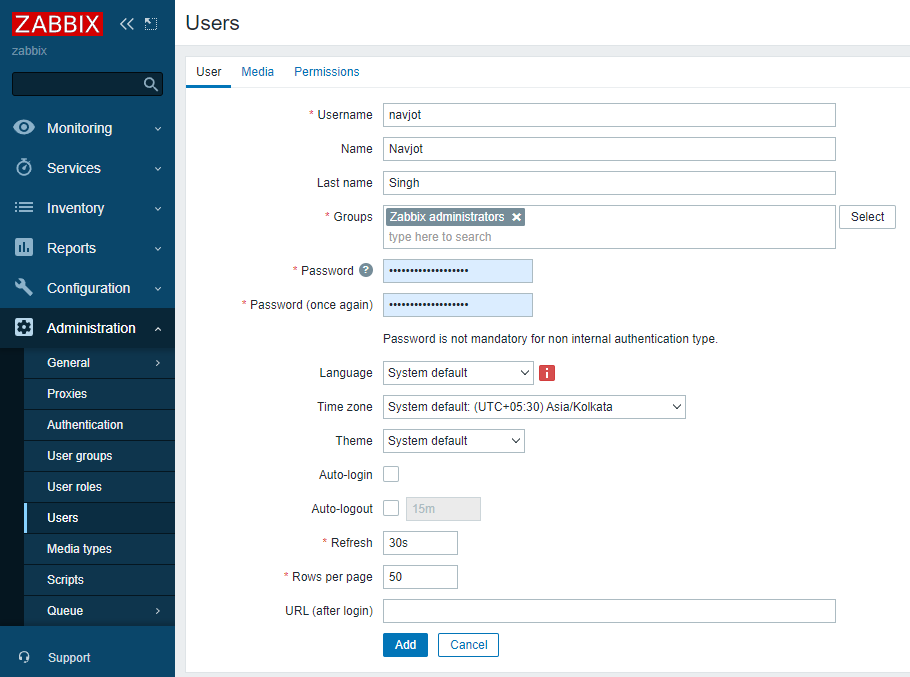
Step 15 – Send a Test Alert
Test the alert system by simulating a situation where disk space is low:
$ fallocate -l 74G /tmp/temp.img
Delete the temporary file after testing:
$ rm -f /tmp/temp.img
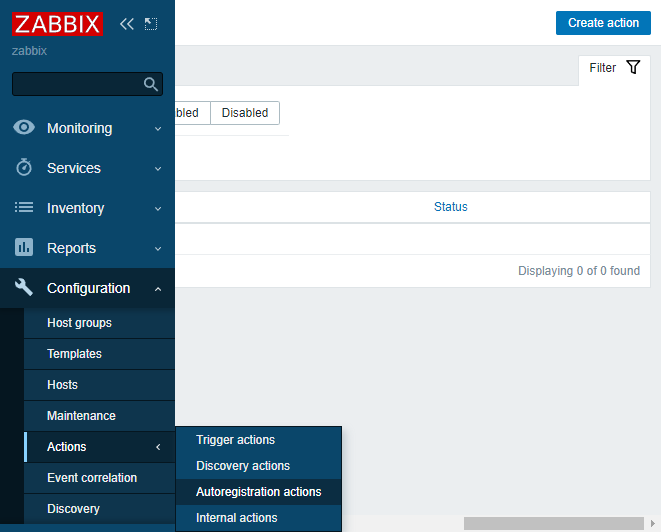
Step 16 – Configure Auto Registration for Linux Nodes
Automate the addition of new Linux nodes by setting up auto-registration:
Conclusion
This tutorial has guided you through installing and configuring a Zabbix server on a Rocky Linux 9 system, including setting up a Zabbix agent on a remote server. If you have any questions, feel free to post them in the comments section below.
FAQ
- Why use Zabbix as a monitoring tool? Zabbix is a free, open-source monitoring tool with a wide range of features, including network/device monitoring and the ability to notify administrators of issues through triggers.
- How is Zabbix secured when monitoring agents? Zabbix offers secure communication with agents using SSL certificates and pre-shared keys (PSK), allowing encryption and data integrity checks.
- Can I use Zabbix with a database other than PostgreSQL? Yes, Zabbix supports various databases, such as MySQL, MariaDB, and others. Configuration steps will differ based on the database choice.
- What if my Linux distribution is different? Installation steps may vary slightly based on distribution, especially package management. Adjust commands and repository installations accordingly.
- What versions of PHP and Nginx are recommended for Zabbix? It’s recommended to use the latest stable versions supported by your Zabbix and OS. This tutorial aligns with PHP 8.2 and Nginx mainline for optimal compatibility.
