Drupal is an open-source content management system (CMS) written in PHP. It’s widely used across the globe for building blogs, government portals, corporate websites, and more. With its extensive suite of features and modules, you can expand its functionality to create almost any type of website.
This tutorial will guide you through the process of installing Drupal using Docker on an Ubuntu 22.04 server. While Drupal supports PHP 8.2 and MySQL, it also supports PostgreSQL since version 9, though there are some known issues. For this tutorial, we’ll use MySQL. We will integrate Drupal with Nginx and use Certbot to enable secure HTTPS connections.
Prerequisites
- A server running Ubuntu 22.04 with at least 1GB of RAM for small sites and 2GB or more for larger communities.
- A non-root user with sudo privileges.
- A fully qualified domain name (FQDN) directed to your server. Here, we use
example.com. - Ensure your system is updated:
$ sudo apt update
- Install essential utility packages, some may already exist:
$ sudo apt install wget curl nano software-properties-common dirmngr apt-transport-https gnupg gnupg2 ca-certificates lsb-release ubuntu-keyring unzip -y
Step 1 – Configure the Firewall
First, we need to configure the firewall using Ubuntu’s default tool, ufw (Uncomplicated Firewall).
To check if it’s running:
$ sudo ufw status
The expected output should be:
Status: inactive
Allow SSH port to prevent breaking current connections:
$ sudo ufw allow OpenSSH
Permit HTTP and HTTPS ports:
$ sudo ufw allow http
$ sudo ufw allow https
Enable the firewall:
$ sudo ufw enable
Command may disrupt existing ssh connections. Proceed with operation (y|n)? y
Firewall is active and enabled on system startup
Verify the firewall status again:
$ sudo ufw status
The output should resemble:
Status: active

To                         Action      From
--                         ------      ----
OpenSSH                    ALLOW       Anywhere
80/tcp                     ALLOW       Anywhere
443                        ALLOW       Anywhere
OpenSSH (v6)               ALLOW       Anywhere (v6)
80/tcp (v6)                ALLOW       Anywhere (v6)
443 (v6)                   ALLOW       Anywhere (v6)
Step 2 – Install Docker and Docker Compose
Ubuntu 22.04 includes an outdated Docker version. To get the latest, first, import Docker’s GPG key:
$ curl -fsSL https://download.docker.com/linux/ubuntu/gpg | sudo gpg --dearmor -o /etc/apt/keyrings/docker.gpg
Create a Docker repository file:
$ echo \
  "deb [arch=$(dpkg --print-architecture) signed-by=/etc/apt/keyrings/docker.gpg] https://download.docker.com/linux/ubuntu \
  $(lsb_release -cs) stable" | sudo tee /etc/apt/sources.list.d/docker.list > /dev/null
Update the system’s repository list:
$ sudo apt update
Install Docker’s newest version:
$ sudo apt install docker-ce docker-ce-cli containerd.io docker-compose-plugin
Check that Docker is operational:
$ sudo systemctl status docker
? docker.service - Docker Application Container Engine
     Loaded: loaded (/lib/systemd/system/docker.service; enabled; vendor preset: enabled)
     Active: active (running) since Sat 2023-01-14 10:41:35 UTC; 2min 1s ago
TriggeredBy: ? docker.socket
       Docs: https://docs.docker.com
   Main PID: 2054 (dockerd)
      Tasks: 52
     Memory: 22.5M
        CPU: 248ms
     CGroup: /system.slice/docker.service
             ??  2054 /usr/bin/dockerd -H fd:// --containerd=/run/containerd/containerd.sock
By default, Docker commands require root privileges. To use Docker without sudo every time, add your user to the docker group:
$ sudo usermod -aG docker $(whoami)
Log out and back in as the same user or run:
$ su - ${USER}
Confirm user addition to the Docker group:
$ groups
navjot wheel docker
Step 3 – Create Docker Compose File for Drupal
Set up the directory for Drupal:
$ mkdir ~/drupal
Navigate to the directory:
$ cd ~/drupal
Create and edit the docker-compose.yml file:
$ nano docker-compose.yml
Insert this configuration:
services:
  mysql:
    image: mysql:8.0
    container_name: mysql
    restart: unless-stopped
    env_file: .env
    volumes:
      - db-data:/var/lib/mysql
    networks:
      - internal

  drupal:
    image: drupal:10-fpm-alpine
    container_name: drupal
    depends_on:
      - mysql
    restart: unless-stopped
    networks:
      - internal
      - external
    volumes:
      - drupal-data:/var/www/html

  webserver:
    image: nginx:1.22.1-alpine
    container_name: webserver
    depends_on:
      - drupal
    restart: unless-stopped
    ports:
      - 80:80
    volumes:
      - drupal-data:/var/www/html
      - ./nginx-conf:/etc/nginx/conf.d
      - certbot-etc:/etc/letsencrypt
    networks:
      - external

  certbot:
    depends_on:
      - webserver
    image: certbot/certbot
    container_name: certbot
    volumes:
      - certbot-etc:/etc/letsencrypt
      - drupal-data:/var/www/html
    command: certonly --webroot --webroot-path=/var/www/html --email sammy@your_domain --agree-tos --no-eff-email --staging -d example.com -d www.example.com

networks:
  external:
    driver: bridge
  internal:
    driver: bridge

volumes:
  drupal-data:
  db-data:
  certbot-etc:
Save with Ctrl + X and type Y.
MySQL Docker Service
We pull the mysql:8.0 image from Docker Hub, ensuring compatibility with Drupal. The container is set to restart unless manually stopped. It uses a .env file for MySQL credentials and employs a named volume db-data for persistent data storage.
Drupal Service
Using the lightweight Drupal 10 Alpine image, this service integrates PHP-FPM for PHP processing, working with Nginx to serve the site. Its depends_on property ensures MySQL starts first, and it connects via internal and external networks, linking to a volume at /var/www/html.
Nginx Service
The Nginx Alpine image exposes port 80 for HTTP traffic. It links various volumes for Drupal’s public directory and SSL certificates using Let’s Encrypt, also connecting to the external network for Drupal access.
Certbot Service
For SSL certificate management, the Certbot image generates staging certificates initially due to ordering requirements (as Nginx depends on these certificates to start). After this, production certificates can be configured by removing the --staging flag.
Step 4 – Create Nginx Configuration
Craft the directory for Nginx setup:
$ mkdir nginx-conf
Generate and edit the Nginx configuration file:
$ nano nginx-conf/drupal.conf
Include this configuration:
server {
    listen 80;
    listen [::]:80;

    server_name drupal.example.com;

    index index.php index.html index.htm;

    root /var/www/html;

    location ~ /.well-known/acme-challenge {
        allow all;
        root /var/www/html;
    }

    location / {
        try_files $uri $uri/ /index.php$is_args$args;
    }

    rewrite ^/core/authorize.php/core/authorize.php(.*)$ /core/authorize.php$1;

    location ~ \.php$ {
        try_files $uri =404;
        fastcgi_split_path_info ^(.+\.php)(/.+)$;
        fastcgi_pass drupal:9000;
        fastcgi_index index.php;
        include fastcgi_params;
        fastcgi_param SCRIPT_FILENAME $document_root$fastcgi_script_name;
        fastcgi_param PATH_INFO $fastcgi_path_info;
    }

    location ~ /\.ht {
        deny all;
    }

    location = /favicon.ico {
        log_not_found off; access_log off;
    }
    location = /robots.txt {
        log_not_found off; access_log off; allow all;
    }
    location ~* \.(css|gif|ico|jpeg|jpg|js|png)$ {
        expires max;
        log_not_found off;
    }
}
Save with Ctrl + X and confirm with Y.
This configuration sets up a basic HTTP server for initial certificate generation, including handling Certbot challenges through the .well-known directory.
Step 5 – Generate SSL Certificates
Kickstart containers to issue SSL certificates:
$ docker compose up -d
Verify service status:
$ docker compose ps
For confirmation, check certificates in the Nginx container:
$ docker compose exec webserver ls -la /etc/letsencrypt/live
Find your certificates under a directory named after your domain. Next, we’ll acquire real certificates. Edit the docker-compose.yml file:
$ nano docker-compose.yml
In the Certbot section, swap --staging for --force-renewal to renew/create certificates:
  certbot:
    depends_on:
      - webserver
    image: certbot/certbot
    container_name: certbot
    volumes:
      - certbot-etc:/etc/letsencrypt
      - drupal-data:/var/www/html
    command: certonly --webroot --webroot-path=/var/www/html --email name@example.com --agree-tos --no-eff-email --staple-ocsp --force-renewal -d drupal.example.com
Save with Ctrl + X and Y, then recreate the Certbot container:
$ docker compose up --force-recreate --no-deps certbot
Upon success, you’ll see message logs similar to those verifying certificate renewal.
Step 6 – Configure Nginx for SSL
Now serve certificates and redirect HTTP traffic to HTTPS by following the steps:
$ docker stop webserver
Create and configure the SSL Nginx file:
$ nano nginx-conf/drupal-ssl.conf
Insert the following for SSL configuration:
server {
    listen 80;
    listen [::]:80;

    server_name drupal.example.com;

    location ~ /.well-known/acme-challenge {
        allow all;
        root /var/www/html;
    }

    location / {
        rewrite ^ https://$host$request_uri? permanent;
    }
}
server {
    listen 443 ssl http2;
    listen [::]:443 ssl http2;
    server_name drupal.example.com;

    index index.php index.html index.htm;

    root /var/www/html;

    server_tokens off;

    ssl_certificate /etc/letsencrypt/live/drupal.example.com/fullchain.pem;
    ssl_certificate_key /etc/letsencrypt/live/drupal.example.com/privkey.pem;
    ssl_trusted_certificate /etc/letsencrypt/live/drupal.example.com/chain.pem;
    ssl_session_timeout 1d;
    ssl_session_cache shared:SSL:10m;
    ssl_session_tickets off;
    ssl_protocols TLSv1.2 TLSv1.3;
    ssl_ciphers ECDHE-ECDSA-AES128-GCM-SHA256:ECDHE-RSA-AES128-GCM-SHA256:ECDHE-ECDSA-AES256-GCM-SHA384:ECDHE-RSA-AES256-GCM-SHA384:ECDHE-ECDSA-CHACHA20-POLY1305:ECDHE-RSA-CHACHA20-POLY1305:DHE-RSA-AES128-GCM-SHA256:DHE-RSA-AES256-GCM-SHA384;
    ssl_prefer_server_ciphers off;
    ssl_ecdh_curve secp384r1;
    ssl_dhparam /etc/ssl/certs/dhparam.pem;

    # OCSP stapling
    ssl_stapling on;
    ssl_stapling_verify on;
    resolver 8.8.8.8 8.8.4.4 valid=300s;
    resolver_timeout 5s;

    add_header X-Frame-Options "SAMEORIGIN" always;
    add_header X-XSS-Protection "1; mode=block" always;
    add_header X-Content-Type-Options "nosniff" always;
    add_header Referrer-Policy "no-referrer-when-downgrade" always;
    add_header Content-Security-Policy "default-src * data: 'unsafe-eval' 'unsafe-inline'" always;

    location / {
        try_files $uri $uri/ /index.php$is_args$args;
    }

    rewrite ^/core/authorize.php/core/authorize.php(.*)$ /core/authorize.php$1;

    location ~ \.php$ {
        try_files $uri =404;
        fastcgi_split_path_info ^(.+\.php)(/.+)$;
        fastcgi_pass drupal:9000;
        fastcgi_index index.php;
        include fastcgi_params;
        fastcgi_param SCRIPT_FILENAME $document_root$fastcgi_script_name;
        fastcgi_param PATH_INFO $fastcgi_path_info;
    }

    location ~ /\.ht {
        deny all;
    }

    location = /favicon.ico {
        log_not_found off; access_log off;
    }
    location = /robots.txt {
        log_not_found off; access_log off; allow all;
    }
    location ~* \.(css|gif|ico|jpeg|jpg|js|png)$ {
        expires max;
        log_not_found off;
    }
}
Save and confirm with Ctrl + X and Y.
The configuration redirects HTTP to HTTPS and incorporates security-enhancing HTTP headers. Next, edit the docker-compose.yml file to expose port 443:
$ nano docker-compose.yml
In the Nginx section, reveal port 443 as follows:
  webserver:
    image: nginx:1.22.1-alpine
    container_name: webserver
    depends_on:
      - drupal
    restart: unless-stopped
    ports:
      - 80:80
      - 443:443
    volumes:
      - drupal-data:/var/www/html
      - ./nginx-conf:/etc/nginx/conf.d
      - certbot-etc:/etc/letsencrypt
      - /etc/ssl/certs/dhparam.pem:/etc/ssl/certs/dhparam.pem
    networks:
      - external
Save with Ctrl + X and Y. Next, remove the non-SSL configuration:
$ rm nginx-conf/drupal.conf
Before restarting Nginx, create a Diffie-Hellman group for additional security:
$ sudo openssl dhparam -dsaparam -out /etc/ssl/certs/dhparam.pem 4096
Recreate the Nginx container:
$ docker compose up -d --force-recreate --no-deps webserver
Verify container status:
$ docker compose ps
Step 7 – Begin the Drupal Web Installer
Access the Drupal setup by opening https://drupal.example.com in your browser. You should see the Drupal Installer Home screen.
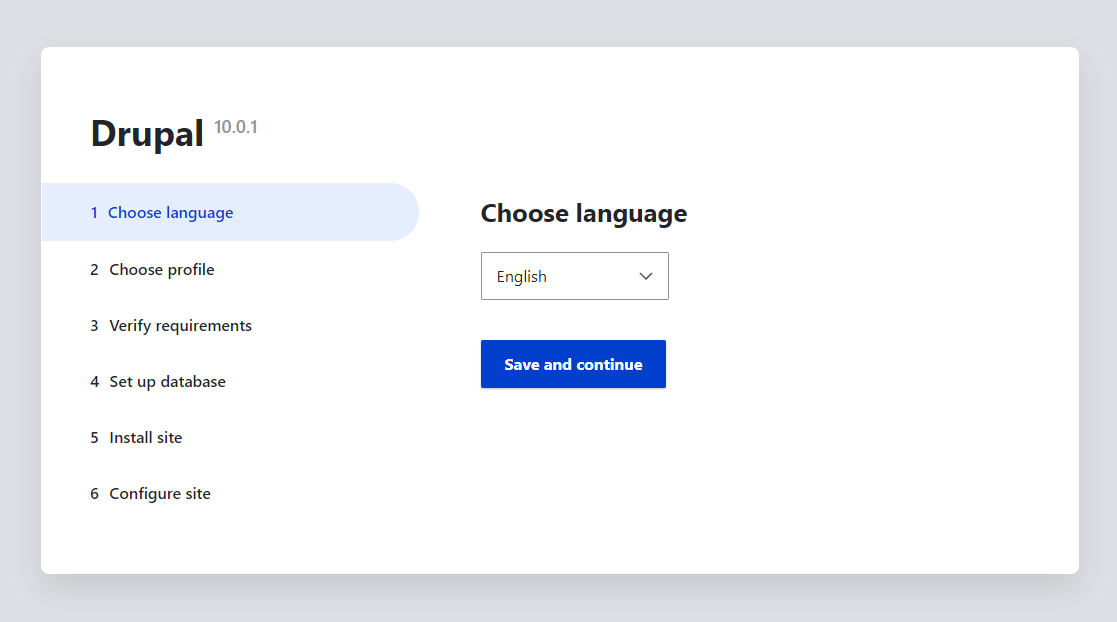
Continue with Save and continue to proceed with installation.
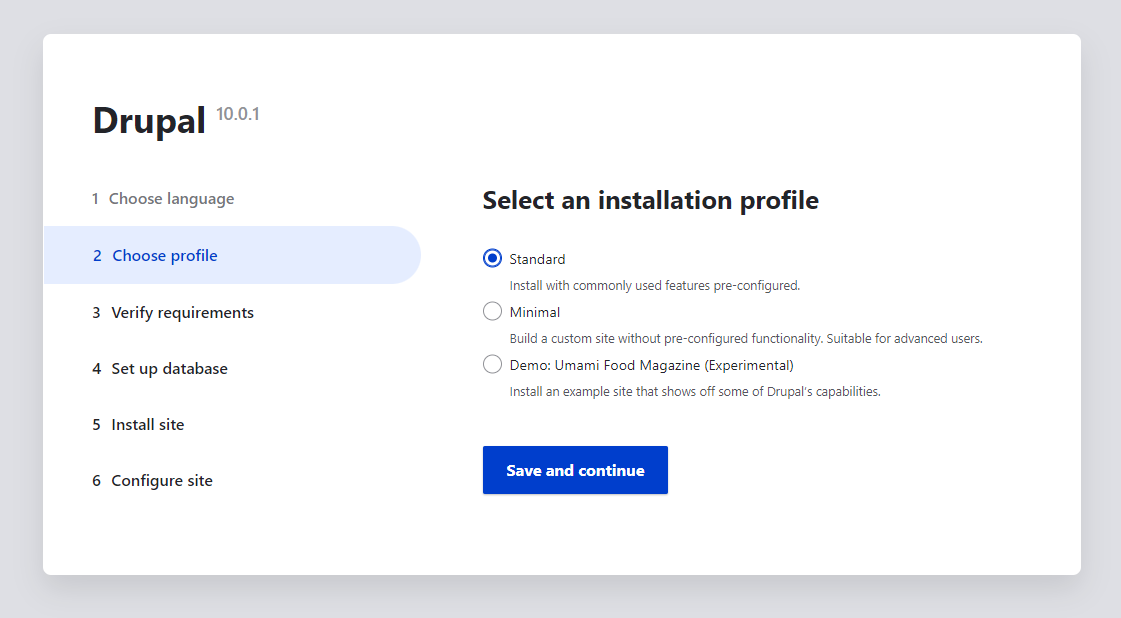
Choose the Standard profile, then continue.
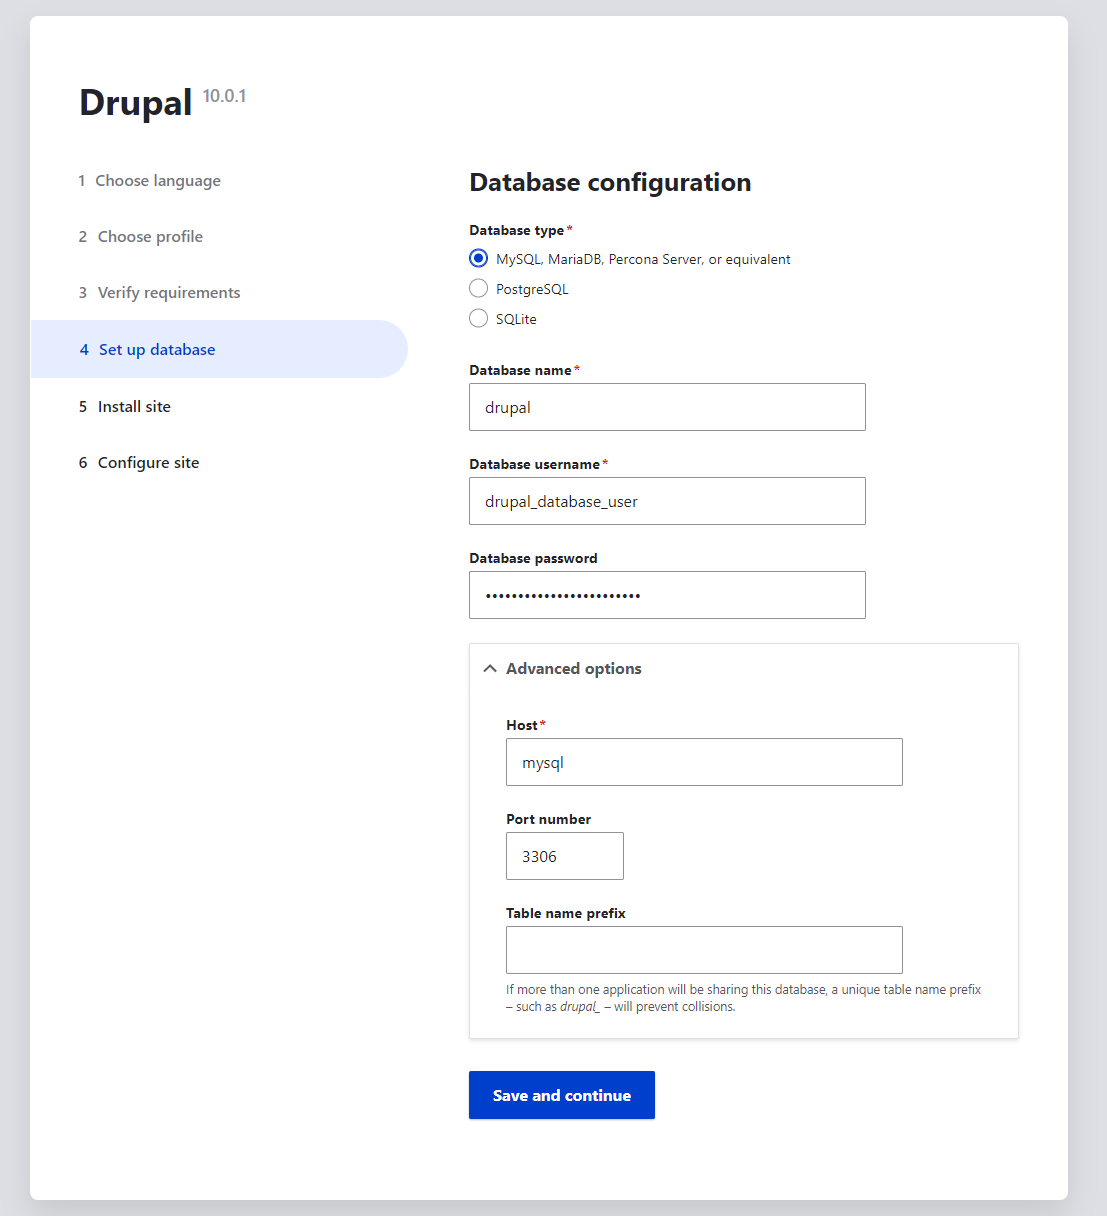
Input database credentials from the environment file and include mysql as the database host under Advanced options.
Continue to complete the setup, letting Drupal install necessary components.
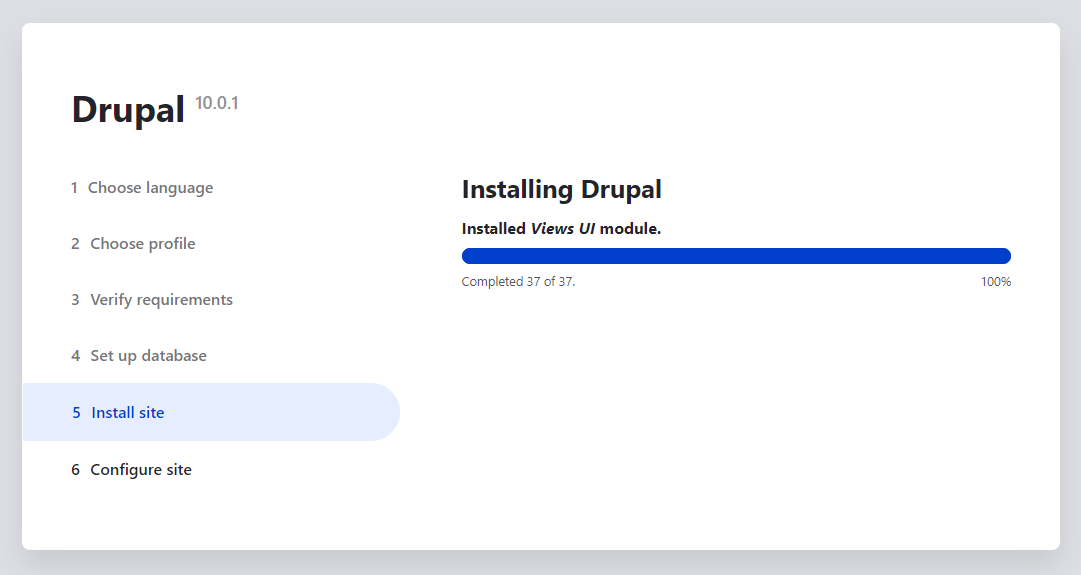
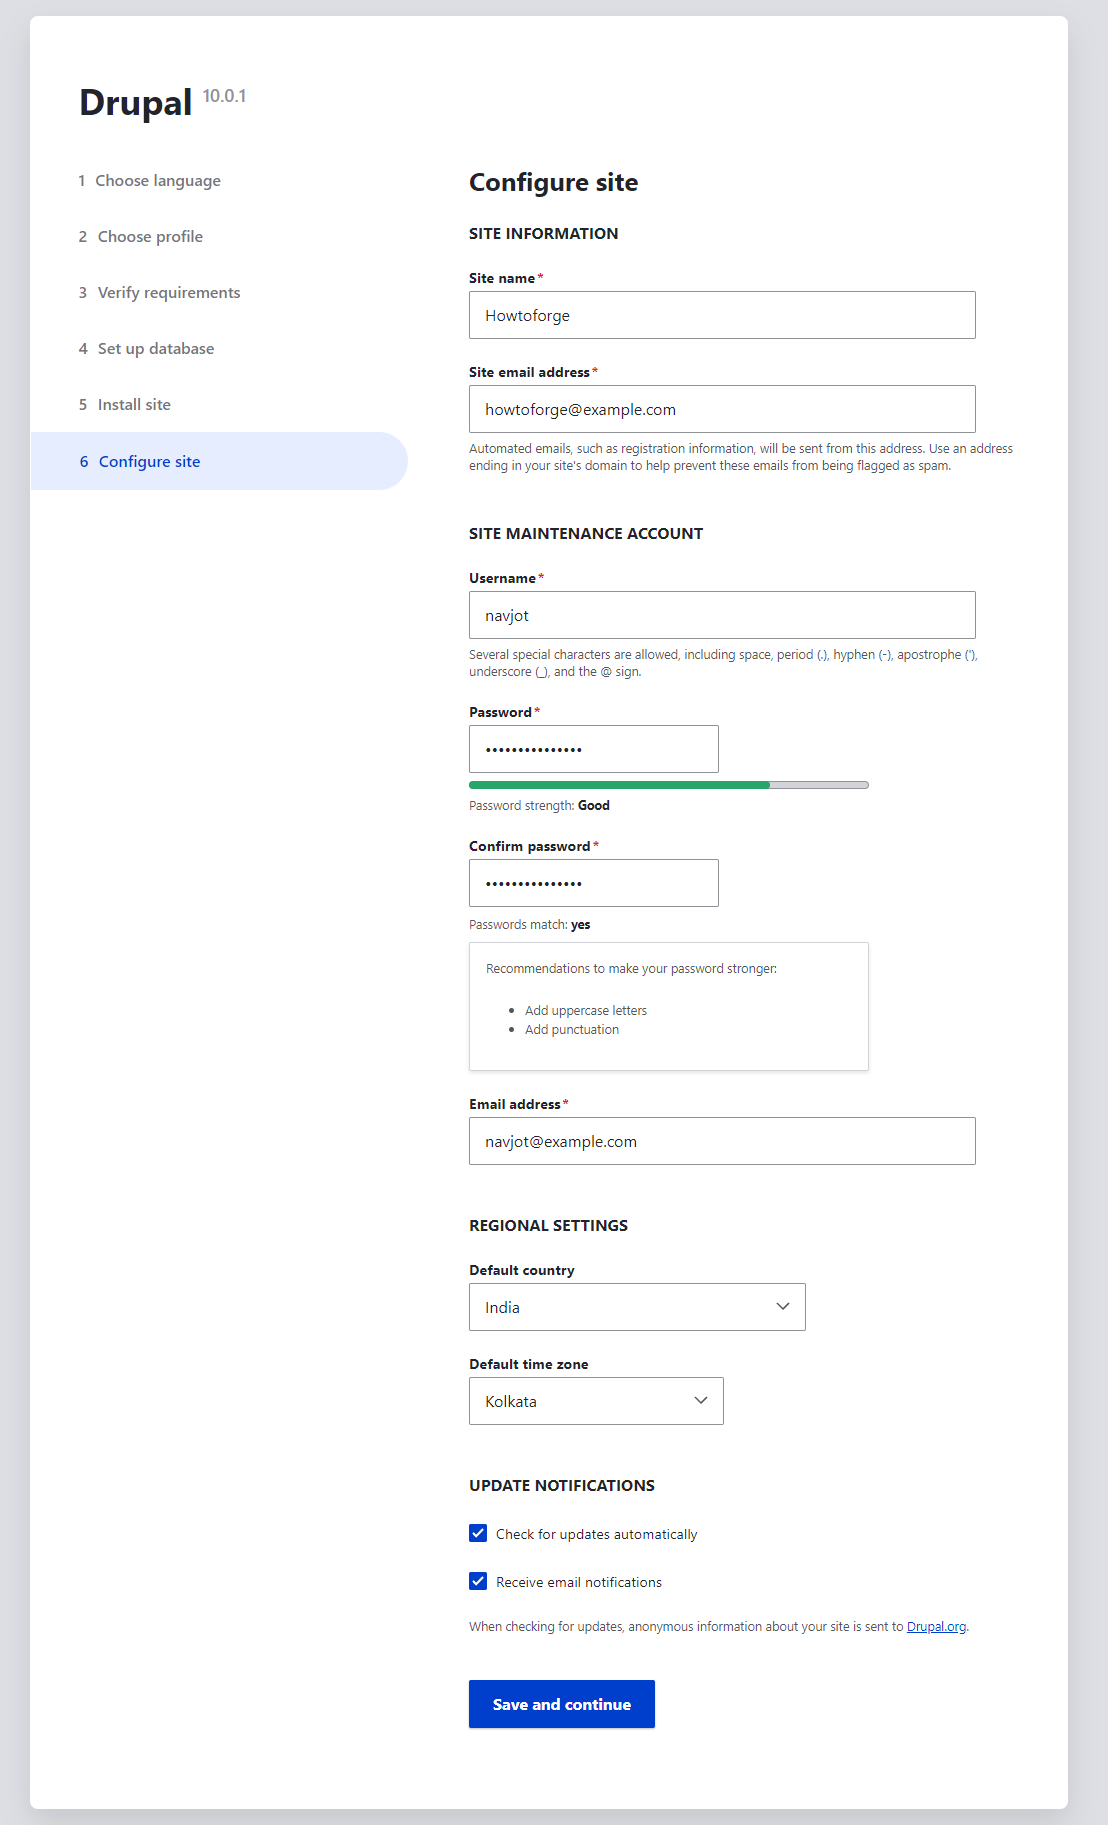
On the configuration page, add site details and click Save and continue.
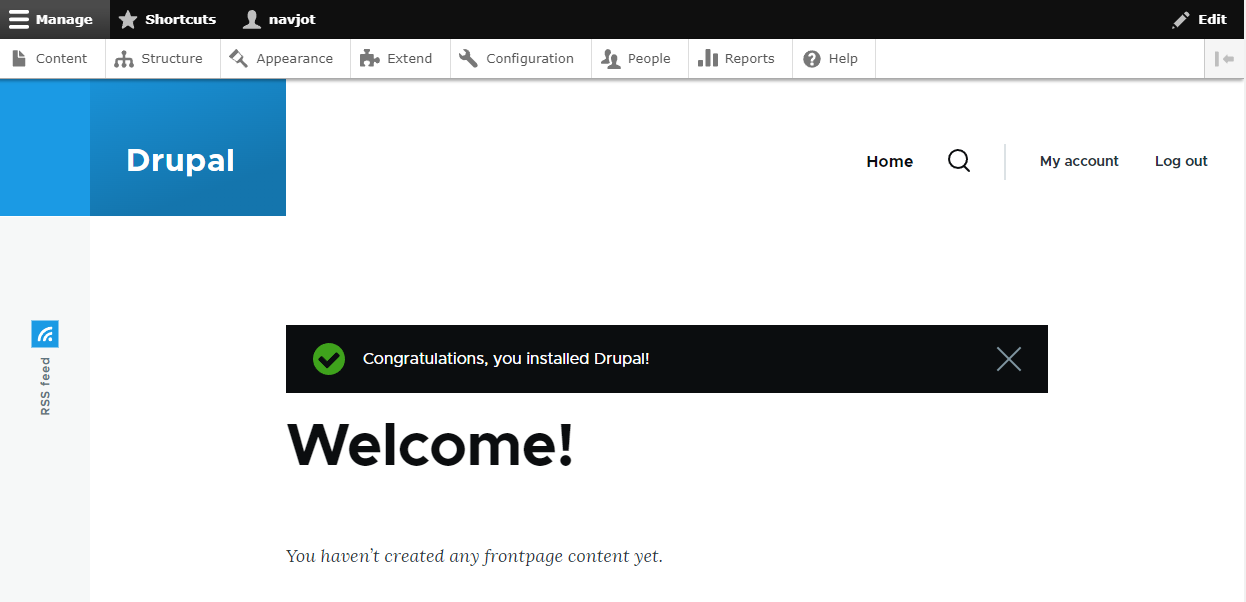
You will arrive at the Drupal dashboard, ready to begin web development!
Step 8 – Configure Drupal
This step is optional but recommended for enhancing Drupal’s performance. Adjust the MySQL transaction isolation level.
Access the MySQL container’s shell:
$ docker exec -it mysql bash
Log into MySQL:
bash-4.4# mysql -u root -p
Enter password:
Configure the transaction isolation level globally:
mysql> SET GLOBAL TRANSACTION ISOLATION LEVEL READ COMMITTED;
Exit both the MySQL shell and the container.
To safeguard against HTTP HOST Header attacks, edit settings.php inside the Drupal container. First, copy it to the host:
$ docker cp drupal:/var/www/html/sites/default/settings.php settings.php
Modify the permission:
$ chmod+w settings.php
Open for editing:
$ nano settings.php
Locate and modify the trusted host pattern:
$settings['trusted_host_patterns'] = [
  '^drupal\.example\.com$',
];
Save and make the file read-only again:
$ chmod -w settings.php
Copy it back into the container:
$ docker cp settings.php drupal:/var/www/html/sites/default
Step 9 – Backup Drupal
Manage Drupal backups from the command line. Begin in the Drupal directory:
$ cd ~/drupal
Create a directory for backups:
$ mkdir backup-data
Backup the Drupal database; a prompt asks for your MySQL root password:
$ docker compose exec mysql sh -c "exec mysqldump drupal -uroot -p" | tee backup-data/data_`date +%d-%m-%Y"_"%H_%M_%S`.sql >/dev/null
Enter password: root_password
Find the SQL backup in ~/drupal/backup-data:
$ ls -al backup-data
total 6716
drwxrwxr-x 2 navjot navjot    4096 Jan 19 13:59 .
drwxrwxr-x 4 navjot navjot    4096 Jan 19 13:35 ..
-rw-rw-r-- 1 navjot navjot 6868325 Jan 19 13:37 data_19-01-2023_13_36_58.sql
Restore using phpMyAdmin or this command:
$ docker compose exec mysql sh -c "exec mysql -uroot -p" < backup-data/data_19-01-2023_13_36_58.sql
Create an automated backup with a cron job:
Design your backup script and edit:
$ sudo nano /etc/cron.daily/drupalbackup.sh
Insert this code:
#!/bin/bash
cd /home/navjot/drupal/
/usr/bin/docker compose exec mysql sh -c "exec mysqldump drupal -uroot -p" | tee backup-data/data_`date +%d-%m-%Y"_"%H_%M_%S`.sql >/dev/null
Make it executable:
$ sudo chmod +x /etc/cron.daily/drupalbackup.sh
The backup will run daily.
Step 10 – Upgrade Drupal
Begin by backing up your database, as outlined previously. Then navigate to the Drupal directory:
$ cd ~/drupal
Bring down the containers:
$ docker compose down
Update container images:
$ docker compose pull drupal:10-fpm-alpine
Update to new major versions by editing image tags and reviewing release notes for guidance.
Revise the docker-compose.yml file if necessary, then restart the containers to fetch minor image updates:
$ docker compose up -d
Conclusion
You have successfully installed Drupal using Docker on an Ubuntu 22.04 server. Should you have any questions or comments, feel free to share below.
Frequently Asked Questions (FAQ)
- Why use Docker to install Drupal?
- Docker simplifies the installation process by isolating the web application from the server environment, ensuring consistent deployments regardless of the host system.
- Do I need to remove the
--stagingflag for SSL certificates? - Yes, remove it to request production-ready certificates after confirming the initial setup is successful.
- How can I automate database backups?
- You can use cron jobs to schedule regular backups as described in step 9 of the guide.
- What should I do before upgrading Drupal?
- Always back up your database and Drupal files to prevent data loss during updates.
- Can I use another web server instead of Nginx?
- Yes, you can replace Nginx with Apache or another server by modifying the Docker Compose configuration and ensuring SSL and network settings are properly adjusted.
