Percona XtraDB Cluster is a comprehensive open-source database clustering solution for MySQL. It facilitates the deployment of a MySQL server cluster that ensures high availability, robust performance, and fault tolerance. The latest release, Percona XtraDB Cluster 8.0, is fully compatible with MySQL Community Edition 8.0, offering features like synchronous replication, multi-source replication, automatic node provisioning, built-in SSL encryption, and optimized performance.
With Percona XtraDB Cluster, you can ensure the high availability of your database, achieve linear scalability, and protect against downtime and data loss.
This guide details the setup of a MySQL cluster using Percona XtraDB Cluster (PXC) on three Rocky Linux 9 servers, enabling database replication across servers. You will install Percona XtraDB Cluster on each server and verify the installation by replicating data between them.
Prerequisites
To complete this guide, you will need two or more servers running Rocky Linux 9 and a non-root user with sudo/root privileges on all servers. SELinux should be in permissive mode. For this setup, we will use three servers:
Hostname       IP Address
--------------------------
pxc-rock01       192.168.5.80
pxc-rock02       192.168.5.81
pxc-rock03       192.168.5.82
Once prerequisites are in place, you can begin the Percona XtraDB Cluster installation process.
Setting up /etc/hosts and Firewalld
First, configure the /etc/hosts file and firewalld on all Rocky Linux servers. Update the /etc/hosts file with server IP addresses and hostnames, and open necessary ports for the Percona XtraDB Cluster.
Ports to open on your firewall:
Ports   Used for
---------------------------
3306    MySQL client connection and SST (State Snapshot Transfer)
4444    SST via Percona XtraBackup
4567    Write-set replication traffic (TCP) and multicast replication (TCP and UDP)
4568    Incremental State Transfer (IST)
Open and edit the /etc/hosts file with:
sudo nano /etc/hosts
Add the cluster’s hostnames and IP addresses:
192.168.5.80  pxc-rock01
192.168.5.81  pxc-rock02
192.168.5.82  pxc-rock03
Save and exit the file. Then, enable the internal network subnet as a trusted source using:
sudo firewall-cmd --permanent --add-source=192.168.5.0/24
Open ports for Percona XtraDB Cluster and apply changes:
sudo firewall-cmd --add-port={3306/tcp,4444/tcp,4567/tcp,4567/udp,4568/tcp} --permanent
sudo firewall-cmd --reload
Verify the enabled rules:
sudo firewall-cmd --list-all
Ensure listed ports are enabled for the cluster.
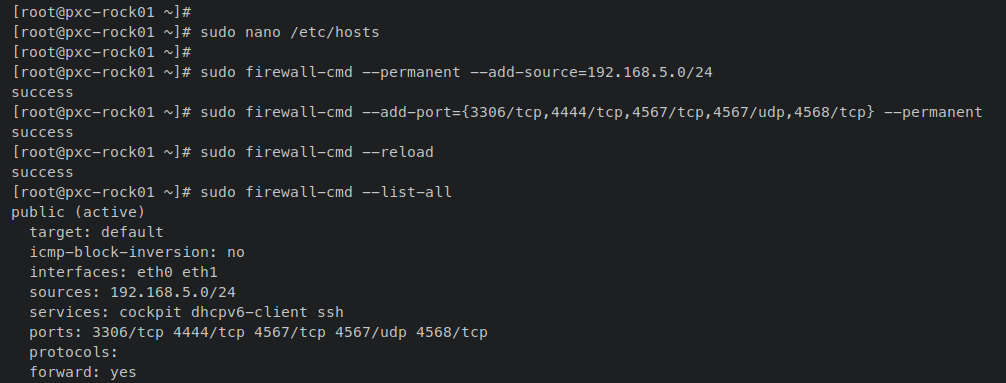
With /etc/hosts configured and firewall rules set, proceed with installing the Percona XtraDB Cluster packages.
Installing Percona XtraDB Cluster
Install Percona XtraDB Cluster on all your Rocky Linux servers by adding the Percona repository, installing the Percona package, and setting a new MySQL root password.
First, install the EPEL repository:
sudo dnf install epel-release
Next, install the Percona release package:
sudo dnf install https://repo.percona.com/yum/percona-release-latest.noarch.rpm -y

Enable the Percona XtraDB Cluster repository:
sudo percona-release setup pxc-80

Check enabled repositories:
sudo dnf repolist

Install the Percona XtraDB Cluster package:
sudo dnf install percona-xtradb-cluster
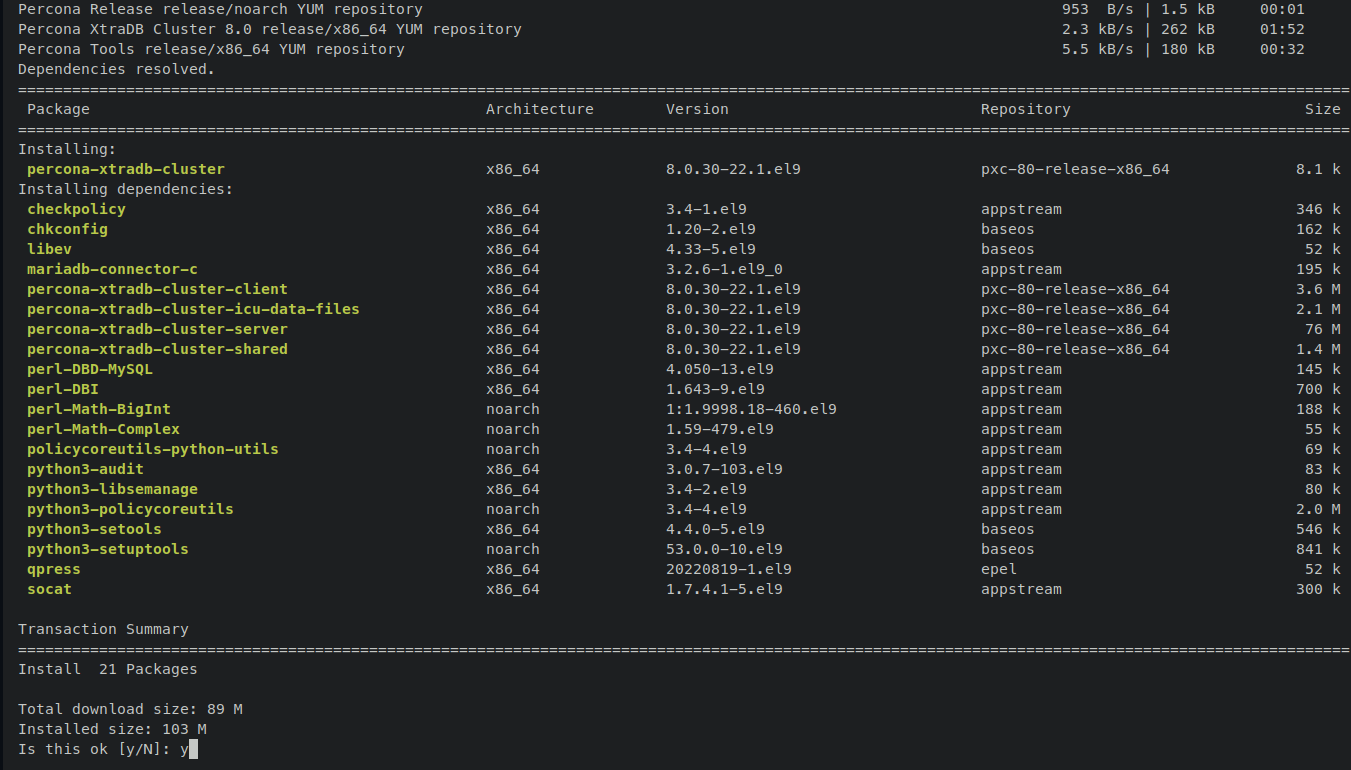
Accept the Percona GPG key:

Start and enable MySQL service:
sudo systemctl start mysql
sudo systemctl enable mysql
Verify MySQL service status:
sudo systemctl status mysql
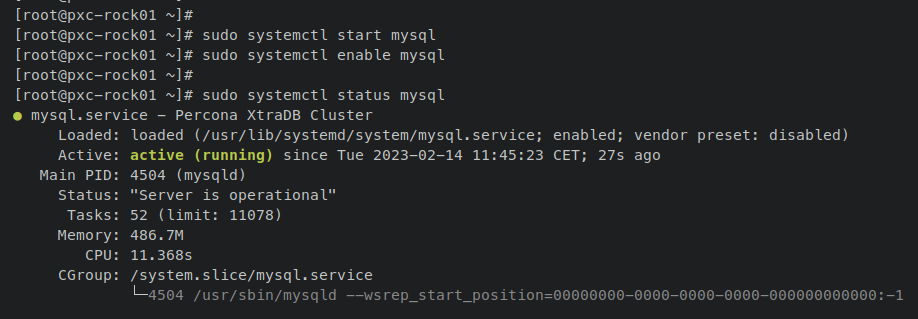
Set new root password by first finding the default:
sudo grep 'temporary password' /var/log/mysqld.log
Log into MySQL and change the root password:
sudo mysql -u root -p
Execute within MySQL shell:
ALTER USER 'root'@'localhost' IDENTIFIED BY 'NewP4ssr00tMySQL';
quit

Stop the MySQL service on all servers to prepare for cluster configuration:
sudo systemctl stop mysql
You’re now ready to configure and set up the cluster.
Copy SSL/TLS Certificates
Percona XtraDB Cluster 8.0 requires intra-cluster communication to be encrypted. This step involves copying SSL/TLS certificates from pxc-rock01 to pxc-rock02 and pxc-rock03.
On pxc-rock01, verify generated certificates:
ls /var/lib/mysql/*.pem

Navigate to /var/lib/mysql:
cd /var/lib/mysql
Copy SSL/TLS certificates using scp:
scp server-key.pem server-cert.pem ca.pem root@pxc-rock02:/var/lib/mysql
scp server-key.pem server-cert.pem ca.pem root@pxc-rock03:/var/lib/mysql
Below is the output for copying certificates to pxc-rock02:

And here is for pxc-rock03:

Initialize Percona XtraDB Cluster on pxc-rock01
Initialize the cluster from pxc-rock01. Modify /etc/my.cnf and start the mysql@bootstrap service.
Edit /etc/my.cnf:
sudo nano /etc/my.cnf
Add server IPs, the cluster address, and default storage engine:
# Cluster connection URL
wsrep_cluster_address=gcomm://192.168.5.80,192.168.5.81,192.168.5.82
# Default storage engine
default_storage_engine=InnoDB

Set node address, node name, and cluster name:
# Node 1 address
wsrep_node_address=192.168.5.80
# Node Name
wsrep_node_name=pxc-rock01
# Cluster name
wsrep_cluster_name=pxc-cluster

Add secure SSL/TLS configuration at the end:
# Enable SSL/TLS
wsrep_provider_options="socket.ssl_key=server-key.pem;socket.ssl_cert=server-cert.pem;socket.ssl_ca=ca.pem"
[sst]
encrypt=4
ssl-key=server-key.pem
ssl-ca=ca.pem
ssl-cert=server-cert.pem

Save and close the file. Start mysql@bootstrap.service:
systemctl start mysql@bootstrap.service
Verify initialization by logging into MySQL and checking wsrep% status:
sudo mysql -u root -p
SHOW STATUS LIKE 'wsrep%';
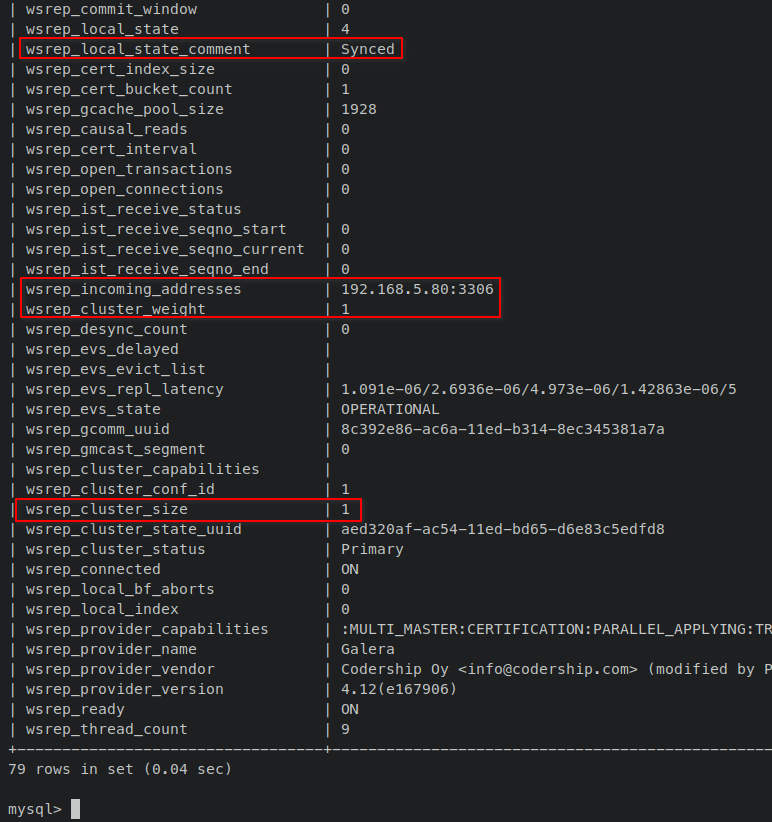
The first server, pxc-rock01, is now initialized. Next, add pxc-rock02 and pxc-rock03 to the cluster.
Adding Server pxc-rock02 to Percona XtraDB Cluster
With the first server initialized, proceed to add pxc-rock02. Edit /etc/my.cnf, set the cluster connection URL, and start the MySQL service.
Edit /etc/my.cnf:
sudo nano /etc/my.cnf
Include your cluster addresses and default storage engine:
# Cluster connection URL
wsrep_cluster_address=gcomm://192.168.5.80,192.168.5.81,192.168.5.82
# Default storage engine
default_storage_engine=InnoDB

Update node address, node name, and cluster name:
# Node #2 address
wsrep_node_address=192.168.5.81
# Node Name
wsrep_node_name=pxc-rock02
# Cluster name
wsrep_cluster_name=pxc-cluster

Secure SSL/TLS configuration:
# Enable SSL/TLS
wsrep_provider_options="socket.ssl_key=server-key.pem;socket.ssl_cert=server-cert.pem;socket.ssl_ca=ca.pem"
[sst]
encrypt=4
ssl-key=server-key.pem
ssl-ca=ca.pem
ssl-cert=server-cert.pem

Save changes and start the MySQL service:
sudo systemctl start mysql
Log into MySQL to verify server addition:
sudo mysql -u root -p
Check wsrep% status:
SHOW STATUS LIKE 'wsrep%';
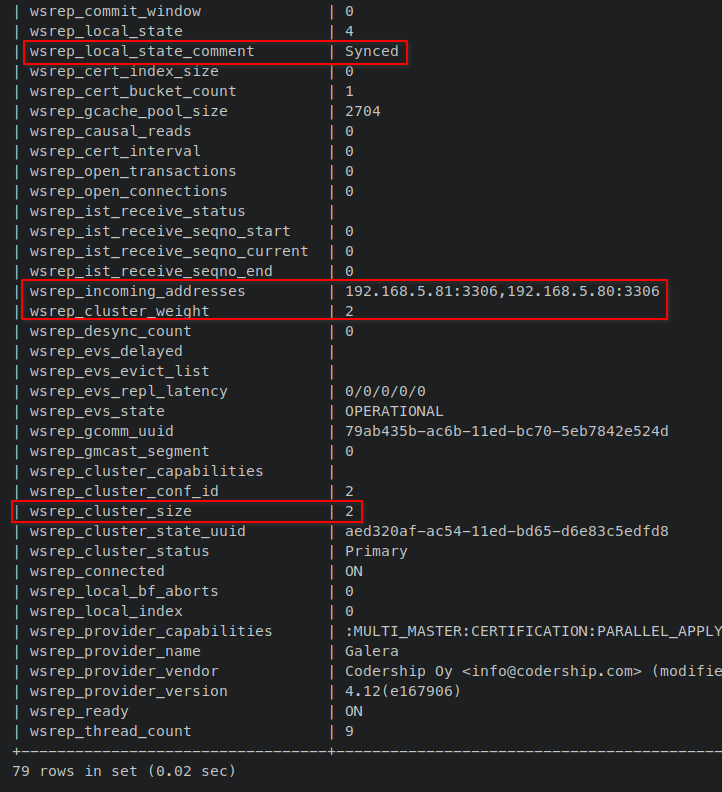
Adding Server pxc-rock03 Server to Percona XtraDB Cluster
Finally, add pxc-rock03 to the cluster. Open and modify /etc/my.cnf.
Open /etc/my.cnf:
sudo nano /etc/my.cnf
Configure the cluster address and storage engine:
# Cluster connection URL
wsrep_cluster_address=gcomm://192.168.5.80,192.168.5.81,192.168.5.82
# Default storage engine
default_storage_engine=InnoDB

Update with node specifics:
# Node #3 address
wsrep_node_address=192.168.5.82
# Node Name
wsrep_node_name=pxc-rock02
# Cluster name
wsrep_cluster_name=pxc-cluster

And secure SSL/TLS settings:
# Enable SSL/TLS
wsrep_provider_options="socket.ssl_key=server-key.pem;socket.ssl_cert=server-cert.pem;socket.ssl_ca=ca.pem"
[sst]
encrypt=4
ssl-key=server-key.pem
ssl-ca=ca.pem
ssl-cert=server-cert.pem

Start MySQL service:
sudo systemctl start mysql
Log into MySQL shell to confirm addition:
sudo mysql -u root -p
Run the status check:
SHOW STATUS LIKE 'wsrep%';
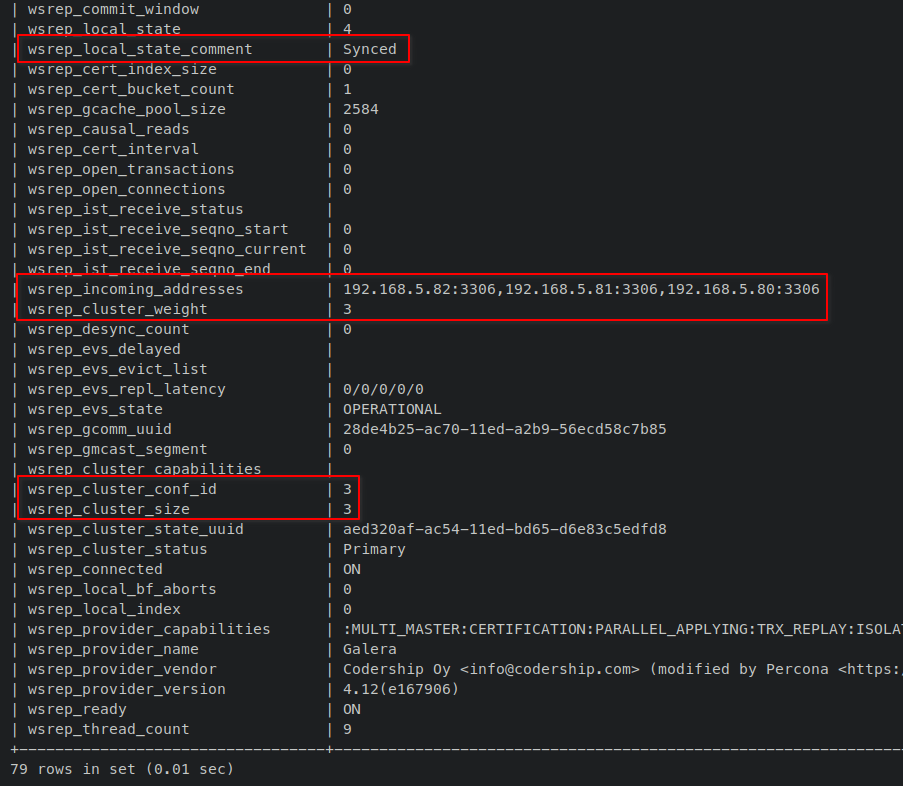
Percona XtraDB Cluster is now configured across three Rocky Linux 9 servers, allowing seamless database replication. Next, we’ll verify the setup.
Testing Database Replication
Verify database replication to ensure successful installation.
From pxc-rock02, log into MySQL and create a database:
sudo mysql -u root -p
CREATE DATABASE testdb;
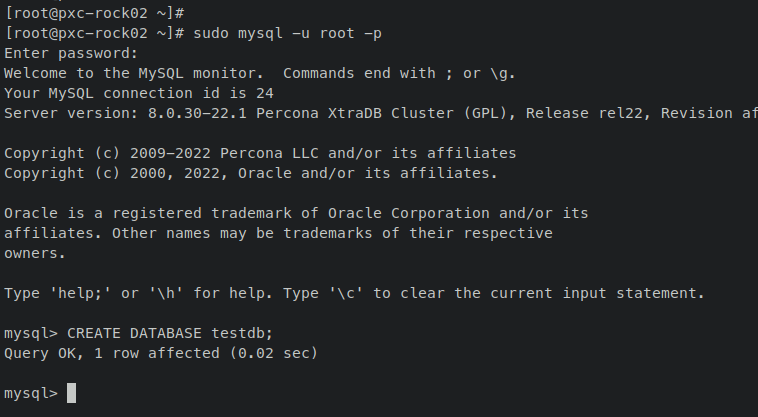
Switch to pxc-rock03, connect to MySQL, and change the database:
sudo mysql -u root -p
USE testdb;
Create a table within the database:
CREATE TABLE table1 (node_id INT PRIMARY KEY, node_name VARCHAR(30));
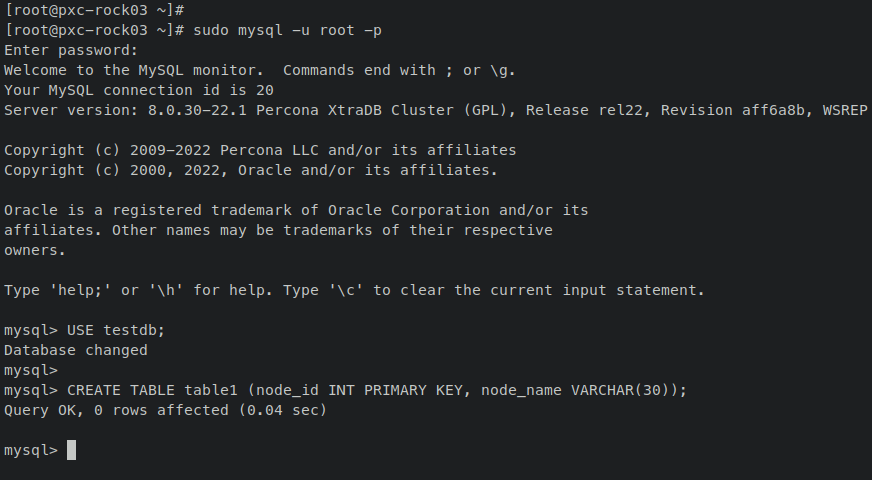
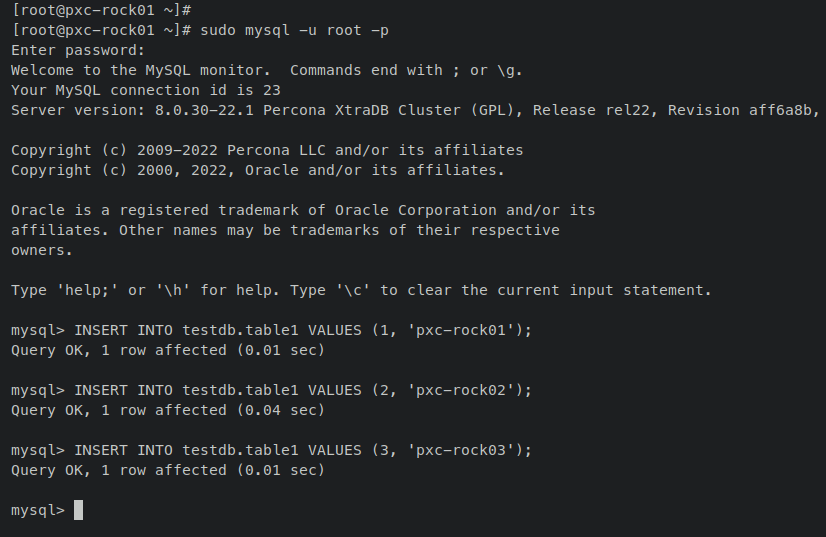
On pxc-rock01, insert data into testdb:
sudo mysql -u root -p
INSERT INTO testdb.table1 VALUES (1, 'pxc-rock01');
INSERT INTO testdb.table1 VALUES (2, 'pxc-rock02');
INSERT INTO testdb.table1 VALUES (3, 'pxc-rock03');
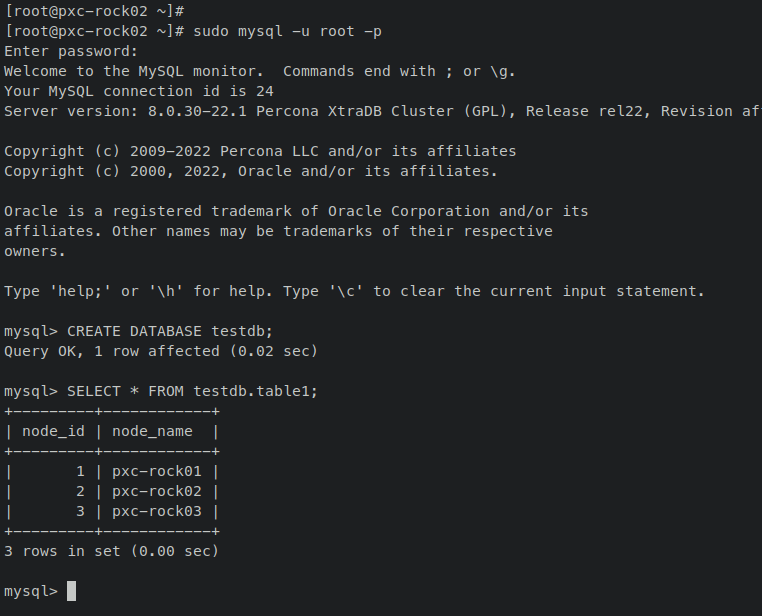
Return to pxc-rock02, run a SELECT query:
SELECT * FROM testdb.table1;
Verify replication success; data should persist across all servers.
Conclusion
This guide demonstrated how to install and configure Percona XtraDB Cluster on three Rocky Linux 9 servers. You have learned to secure your setup with a firewall and SSL/TLS certificates, and verify database replication is successful.
This setup allows you to expand your existing Percona XtraDB Cluster easily by adding additional nodes following the procedures outlined. Additionally, consider implementing load balancing and high availability with tools like ProxySQL or HAProxy for improved performance and reliability.
FAQ
What are the main benefits of using Percona XtraDB Cluster?
Percona XtraDB Cluster offers high availability, linear scalability, fault tolerance, and features like synchronous replication and automatic failover, making it ideal for critical applications requiring minimal downtime.
Do I need a specific number of servers to set up Percona XtraDB Cluster?
While the minimum is three servers to form a quorum, you can start with two for testing purposes, but three or more are recommended for production environments.
What should I do if one of my cluster nodes fails?
If a node fails, it will automatically rejoin the cluster once it restarts and recovers. Ensure the remaining nodes are healthy and continue operating to maintain data availability.
Can I deploy Percona XtraDB Cluster in a different Linux distribution?
Yes, Percona XtraDB Cluster can be deployed on several Linux distributions like Ubuntu, CentOS, and Debian, following equivalent installation steps for those systems.
How do I secure network communication between cluster nodes?
Network communication is securely encrypted by default using SSL/TLS certificates. Ensure certificates are correctly distributed and configured across all nodes, as shown in this guide.
