NTP, or Network Time Protocol, is a crucial networking protocol used for time and clock synchronization across computer networks.
Chrony is a versatile implementation of NTP and serves as an alternative to other applications like ntpd. It’s designed for Unix-like operating systems and is distributed under the GNU GPL v2 license. Notably, Chrony is the default NTP server software in several Linux distributions and can be installed on various Linux platforms.
In this guide, we’ll walk you through the process of installing and using Chrony on a Rocky Linux server. You will explore two primary modes of using Chrony:
- Using Chrony as an NTP Server – Ideal for setting up an NTP server within your local environment, allowing clients to connect locally instead of reaching out to public NTP servers on the internet.
- Using Chrony as an NTP Client – Suitable for synchronizing the time on your machine or client to a designated NTP server.
Prerequisites
This guide presupposes two distinct Rocky Linux servers, one to act as the NTP Server and the other as the NTP Client. You can choose Rocky Linux v8 or the latest version 9. A non-root user with sudo privileges is needed on both machines.
The setup will use the following server information:
Hostname        IP Address      Used as
------------------------------------
rocky8         192.168.5.100   NTP Server
client1        192.168.5.120   NTP Client
Let’s delve into the installation and configuration of Chrony.
Installing the Chrony Package
Chrony is readily available from the baseos repository on Rocky Linux.
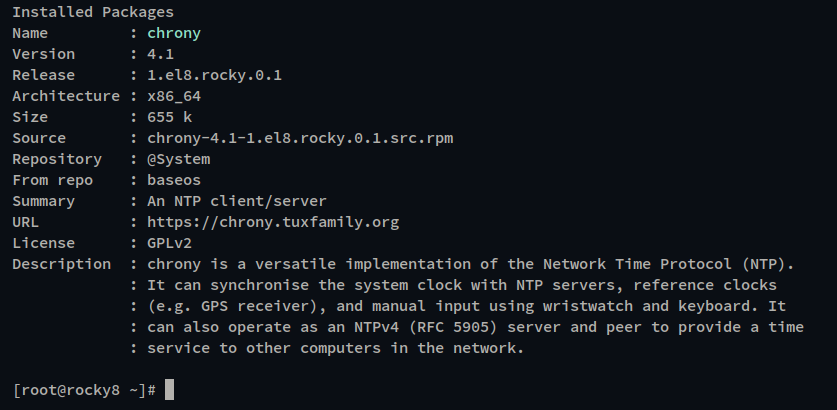
Begin by inspecting the Chrony package details using the command below:
sudo dnf info chrony
You should observe detailed information about the current Chrony package (version 4.1) within the repository, as shown in the image below:
Proceed with the installation of Chrony using the following command. When prompted, confirm by entering y and pressing ENTER:
sudo dnf install chrony
Post-installation, activate and start the Chronyd service:
sudo systemctl enable chronyd
sudo systemctl start chronyd
Verify the status of Chronyd using:
sudo systemctl status chronyd
The Chronyd service should be running and configured to start automatically at boot. See the verification in the screenshot below:

Configuring Chrony as an NTP Server
Follow these steps to configure Chrony as an NTP Server on your Rocky Linux server. We will demonstrate with the server ‘rocky8’ (IP: 192.168.5.100).
Edit the ‘/etc/chrony.conf‘ file:
sudo nano /etc/chrony.conf
Specify your NTP server sources in the ‘server’ directives. You can find a suitable NTP server pool for your region at ntppool.org. The configuration below uses the iburst option for fast synchronization:
# NTP server list
server 0.se.pool.ntp.org iburst
server 1.se.pool.ntp.org iburst
server 2.se.pool.ntp.org iburst
server 3.se.pool.ntp.org iburst
Uncomment the ‘allow‘ directive and specify which network can access the NTP server. Here, the network ‘192.168.5.0/24‘ is allowed:
# Allowed clients
allow 192.168.5.0/24
Save the changes and exit the editor.
For additional configuration, consider updating options like:
# Stepping the system clock in the first three updates
makestep 1.0 3
# Enabling hardware timestamping
#hwtimestamp *
# NTP authentication keys file
keyfile /etc/chrony.keys
# TAI-UTC offset and leap seconds from tz database
leapsectz right/UTC
Restart the Chronyd service to apply your changes:
sudo systemctl restart chronyd
Verify the configured NTP server sources:
chronyc sources

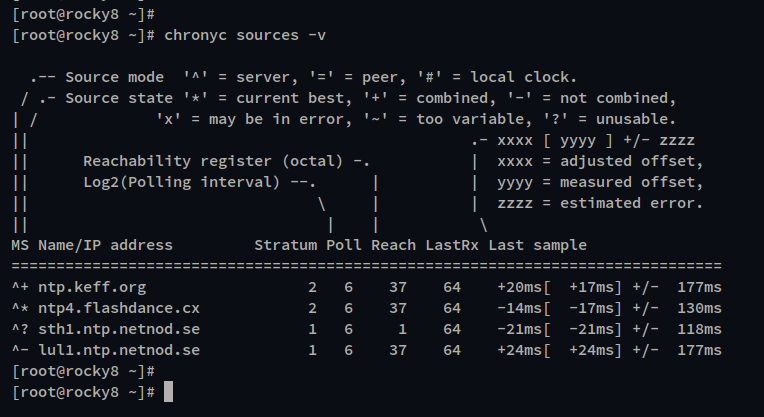
For detailed information, use the verbose option:
chronyc sources -v
The following image reveals in-depth NTP server source details:
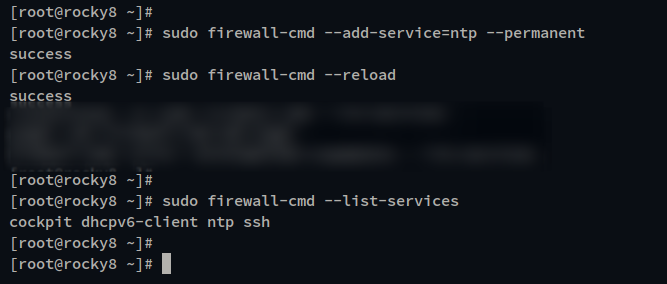
Next, configure the firewalld to allow NTP service by executing:
sudo firewall-cmd --add-service=ntp --permanent
sudo firewall-cmd --reload
For more specific access, use Firewalld Rich Rules as shown below. Allow subnet ‘192.168.5.0/24‘ access to the NTP Server:
sudo firewall-cmd --permanent --add-rich-rule="rule family='ipv4' source address='192.168.5.0/24' service='ntp' accept"
sudo firewall-cmd --reload
Check the firewalld rules to ensure proper configuration:
sudo firewall-cmd --list-all
You are done configuring Chrony as an NTP Server on your Rocky Linux server. Next, set up Chrony as an NTP Client.
Configuring Chrony as an NTP Client
In this section, we’ll configure Chrony as an NTP client on the Rocky Linux system. We’ll use a machine with hostname ‘client1‘.
Ensure the Chrony package is installed on the client machine:
sudo dnf install chrony -y
Edit the ‘/etc/chrony.conf‘ configuration file to update the server sources. Set the NTP server’s IP (e.g., ‘192.168.5.100’). You can add options like:
- The iburst option for rapid initial synchronization.
- The prefer option to prioritize this server.
server 192.168.5.100 iburst prefer
Save and exit the file editor.
Restart the Chrony service to enforce the new settings:
sudo systemctl restart chronyd
Check the NTP client status with:
chronyc tracking
The ‘client1‘ machine should now show synchronization with NTP Server ‘192.168.5.100’. Screenshot verification below:
![]()
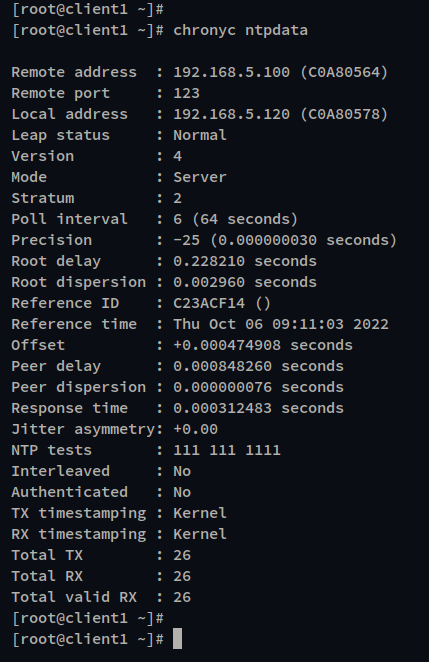
For more detailed NTP data, run:
chronyc ntpdata
Check the ‘Remote address’ for the NTP Server’s IP and ‘Local address’ for the client’s IP:
You can also verify sources with these commands:
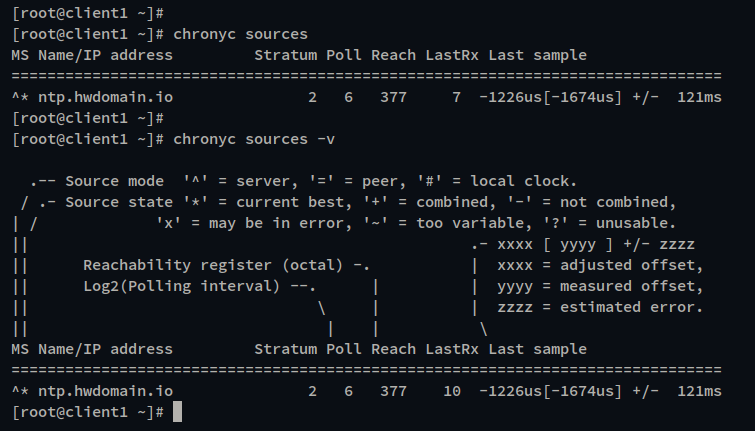
chronyc sources
chronyc sources -v
On executing, ‘client1‘ should list ‘192.168.5.100’ as the preferred NTP source. Screenshot evidence is below:
Conclusion
Congratulations! You have successfully installed and configured Chrony, a robust NTP implementation, on Rocky Linux. We’ve covered using Chrony as both an NTP Server and Client, and explored basic usage of the chronyc command for assessing NTP status.
Frequently Asked Questions (FAQ)
- What is Chrony?
Chrony is a software package used for clock synchronization in Unix-like OSes, providing functionalities for both NTP clients and servers. - Why use Chrony instead of other NTP software?
Chrony is preferred for scenarios with intermittent network connections, and it adjusts faster to changes in the system clock. - Can Chrony be used on non-Linux systems?
Yes, Chrony can be used on various Unix-like systems, although it’s most common in Linux distributions. - How do I know if my Chrony configuration is working?
You can check using thechronyc trackingandchronyc sourcescommands, which will display the NTP synchronization status. - What does the ‘iburst’ option do?
The ‘iburst’ option allows for rapid synchronization when Chrony starts, quickly aligning time with an NTP server.
