Osquery is an open-source tool designed for system instrumentation, monitoring, and analytics. Developed by Facebook, it presents the operating system as a fast relational database, facilitating queries using SQL syntax.
This versatile software is compatible with Linux, Windows, MacOS, and FreeBSD, enabling in-depth analysis of these systems’ profiles, performance, and security through SQL queries.
This guide demonstrates how to set up File Integrity Monitoring (FIM) using osquery on Linux systems, specifically on Ubuntu 18.04 and CentOS 7.
Prerequisites
- A Linux distribution, either Ubuntu or CentOS
- Root privileges
- Completion of the initial osquery setup guide
Setup Overview
- Install osquery on the Linux server
- Enable Syslog for osquery
- Basic osquery Configuration
- Configure File Integrity Monitoring using osquery
- Testing the FIM setup
Step 1 – Install osquery on Linux Server
Osquery can be installed via its official repositories. Start the installation process as outlined below for your specific distribution.
On Ubuntu
Add the osquery key to the system:
export OSQUERY_KEY=1484120AC4E9F8A1A577AEEE97A80C63C9D8B80B
sudo apt-key adv --keyserver keyserver.ubuntu.com --recv-keys $OSQUERY_KEY
Add the osquery repository and install the package:
sudo add-apt-repository 'deb [arch=amd64] https://pkg.osquery.io/deb deb main'
sudo apt install osquery -y
On CentOS
Add the osquery key to the system:
curl -L https://pkg.osquery.io/rpm/GPG | sudo tee /etc/pki/rpm-gpg/RPM-GPG-KEY-osquery
Add and enable the osquery repository, then install the package:
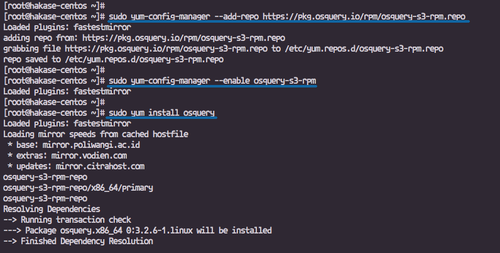
sudo yum-config-manager --add-repo https://pkg.osquery.io/rpm/osquery-s3-rpm.repo
sudo yum-config-manager --enable osquery-s3-rpm
sudo yum install osquery -y
Ensure all packages are installed successfully.
Note: If you encounter the following error:
sudo: yum-config-manager: command not found
Install the ‘yum-utils’ package:
yum -y install yum-utils
Step 2 – Enable Syslog Consumption in osquery
Osquery consumes system logs through syslog on Linux. Enable syslog by installing the necessary packages.
On Ubuntu
Install the rsyslog package:
sudo apt install rsyslog -y
On CentOS
Install the rsyslog package:
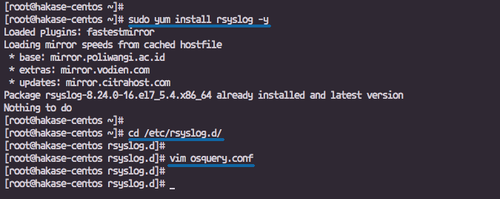
sudo yum install rsyslog -y
Create a new configuration file, osquery.conf, in the /etc/rsyslog.d directory:
cd /etc/rsyslog.d/
vim osquery.conf
Add the following configuration:
template(
      name="OsqueryCsvFormat"
      type="string"
      string="%timestamp:::date-rfc3339,csv%,%hostname:::csv%,%syslogseverity:::csv%,%syslogfacility-text:::csv%,%syslogtag:::csv%,%msg:::csv%\n"
    )
    *.* action(type="ompipe" Pipe="/var/osquery/syslog_pipe" template="OsqueryCsvFormat")
Save and exit the editor.
Step 3 – Basic Configuration of osquery
Osquery’s default configuration is typically found in /etc/osquery/osquery.conf. Below, you’ll learn about the configuration elements and how to customize them to your needs.
- Options: Sets CLI options for osqueryd initialization.
- Schedule: Defines scheduling for queries.
- Decorators: Adds metadata to logs.
- Packs: Groups of scheduled queries.
- Additional Elements: File Paths, YARA, etc.
Create a custom configuration file called osquery.conf:
cd /etc/osquery/
vim osquery.conf
Insert this configuration:
{
        "options": {
            "config_plugin": "filesystem",
            "logger_plugin": "filesystem",
            "logger_path": "/var/log/osquery",
            "disable_logging": "false",
            "log_result_events": "true",
            "schedule_splay_percent": "10",
            "pidfile": "/var/osquery/osquery.pidfile",
            "events_expiry": "3600",
            "database_path": "/var/osquery/osquery.db",
            "verbose": "false",
            "worker_threads": "2",
            "enable_monitor": "true",
            "disable_events": "false",
            "disable_audit": "false",
            "audit_allow_config": "true",
            "host_identifier": "hakase-labs",
            "enable_syslog": "true",
            "syslog_pipe_path": "/var/osquery/syslog_pipe",
            "force": "true",
            "audit_allow_sockets": "true",
            "schedule_default_interval": "3600"
        },
        "schedule": {
            "crontab": {
                "query": "SELECT * FROM crontab;",
                "interval": 300
            },
            "system_info": {
                "query": "SELECT hostname, cpu_brand, physical_memory FROM system_info;",
                "interval": 3600
            },
            "ssh_login": {
                "query": "SELECT username, time, host FROM last WHERE type=7",
                "interval": 360
            }
        },
        "decorators": {
            "load": [
                "SELECT uuid AS host_uuid FROM system_info;",
                "SELECT user AS username FROM logged_in_users ORDER BY time DESC LIMIT 1;"
            ]
        },
        "packs": {
            "osquery-monitoring": "/usr/share/osquery/packs/osquery-monitoring.conf"
        }
    }
Save the file and exit.
Notes:
- Utilizing ‘filesystem’ for config and logging plugins.
- Logs are stored in
/var/log/osquery. - Scheduler includes checks for crontab, system info, and SSH logins.
- Enabled the ‘osquery-monitoring’ pack located in
/usr/share/osquery/packs.
Start and enable the osqueryd service:
systemctl start osqueryd
systemctl enable osqueryd
Restart the rsyslog service:
systemctl restart rsyslog
Basic configuration is complete.

Step 4 – Configure File Integrity Monitoring (FIM) Using osquery
Osquery can monitor file integrity on Linux using inotify. You can track changes in specified directories and log them in the ‘file_events’ table.
Set up FIM by monitoring crucial directories like home, etc, tmp, and www.
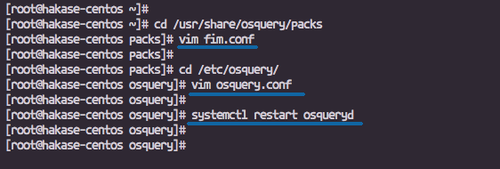
Create a FIM configuration fim.conf file:
cd /usr/share/osquery/packs
vim fim.conf
Insert the following configuration:
{
      "queries": {
        "file_events": {
          "query": "SELECT * FROM file_events;",
          "removed": false,
          "interval": 300
        }
      },
      "file_paths": {
        "homes": [
          "/root/.ssh/%%",
          "/home/%/.ssh/%%"
        ],
        "etc": [
          "/etc/%%"
        ],
        "home": [
          "/home/%%"
        ],
        "tmp": [
          "/tmp/%%"
        ],
        "www": [
          "/var/www/%%"
        ]
      }
    }
Save and exit.
Edit the osquery configuration file to include the FIM pack:
cd /etc/osquery/
vim osquery.conf
Update the ‘packs’ section:
    "packs": {
        "osquery-monitoring": "/usr/share/osquery/packs/osquery-monitoring.conf",
        "fim": "/usr/share/osquery/packs/fim.conf"
    }
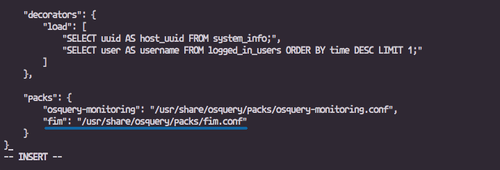
Save the file, then restart the osqueryd service:
systemctl restart osqueryd
Note: It’s crucial to validate your JSON configuration with a tool like JSON Linter to ensure no errors.
Step 5 – Testing
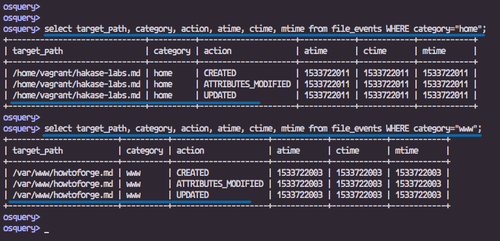
To test the FIM setup, create files in the home and www directories.
Create a file in the /var/www/ directory:
cd /var/www/
touch howtoforge.md
Create another file in the /home/youruser/ directory:
cd /home/vagrant/
touch hakase-labs.md
Use osqueryi to inspect logs in real-time:

Using osqueryi
Launch osqueryi with:
osqueryi --config-path /etc/osquery/osquery.conf
Retrieve logs about file events:
select * from file_events;
Check logs for the home directory:
select target_path, category, action, atime, ctime, mtime from file_events WHERE category="home";
And for the www directory:
select target_path, category, action, atime, ctime, mtime from file_events WHERE category="www";
Examining osqueryd results log
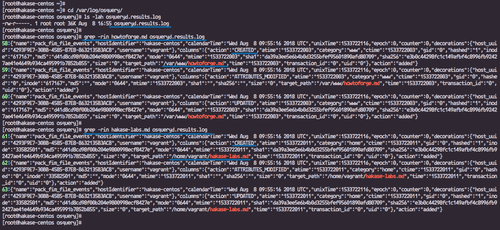
Navigate to /var/log/osquery and examine osqueryd.results.log for entries:
cd /var/log/osquery/
ls -lah osqueryd.results.log
Use grep to filter logs by file name:
grep -rin howtoforge.md osqueryd.results.log
grep -rin hakase-labs.md osqueryd.results.log
You’ll find record entries indicating the file creations.
The osquery-based File Integrity Monitoring is now successfully configured on Ubuntu and CentOS.
References
FAQ
What is osquery?
Osquery is a tool for system instrumentation and analysis, providing system information as a high-performance relational database.
Which platforms are compatible with osquery?
Osquery can be installed on Linux, Windows, MacOS, and FreeBSD.
What is File Integrity Monitoring (FIM)?
FIM tracks file changes in key directories and logs these activities, enhancing system security and monitoring.
Can I define custom directories for FIM?
Yes, custom directories can be defined in the FIM configuration (fim.conf).
How do I verify my osquery JSON configurations?
A JSON linter such as JSON Linter should be used to check your configuration files for errors.
