Puppet is a powerful open-source configuration management tool and server automation framework. It operates seamlessly across Unix-like operating systems and Microsoft Windows systems, enabling the management and configuration of numerous systems from a single master server.
In this tutorial, you will learn how to install Puppet on CentOS 7. We will configure one CentOS 7 server as a Puppet master and another as a Puppet agent.
Prerequisites
- 2 CentOS 7 servers
- 10.0.15.10 master.hakase.io 2GB Memory
- 10.0.15.11 agent.hakase.io
- Root privileges
Steps Covered
- Puppet Pre-Installation
- Install and Configure Puppet Server
- Install and Configure Puppet Agent
- Verify Puppet Agent Configuration
- Create Your First Puppet Manifest
Step 1: Puppet Pre-Installation
In this initial step, we will prepare both the Puppet master and agent servers with essential configuration tasks. We will configure the hosts file, synchronize time using NTP, disable SELinux, and add the Puppet repository to the system.
Configure Hosts
Connect to the Puppet master and agent using the root user:
ssh root@10.0.15.10
ssh root@10.0.15.11
Edit the hosts file using vim editor:
vim /etc/hosts
Add the following configuration at the end of the file:
10.0.15.10      master.hakase.io
10.0.15.11      agent.hakase.io
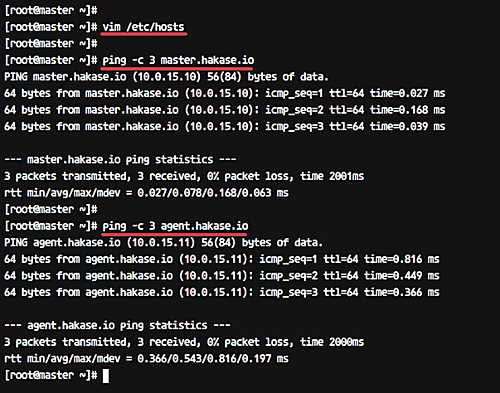
Save and exit. Test the configuration using the ping command:
ping master.hakase.io
ping agent.hakase.io
Ensure the server IP addresses 10.0.15.10 and 10.0.15.11 are correct.

Configure NTP Server
Keeping the time synchronized between the master and agent servers is crucial. Install NTP packages on both servers:
yum -y install ntp ntpdate
Synchronize the time with an NTP pool:
sudo ntpdate 0.centos.pool.ntp.org
Start the NTP service and enable it to start on boot:
sudo systemctl start ntpd
sudo systemctl enable ntpd
NTP installation and configuration are complete.

Disable SELinux
Edit the SELinux configuration:
vim /etc/sysconfig/selinux
Set SELINUX to ‘disabled’:
SELINUX=disabled
Save and exit.
Add Puppet Repository
Add the Puppet repository to the system:
rpm -Uvh https://yum.puppetlabs.com/puppet5/puppet5-release-el-7.noarch.rpm

Reboot both servers to apply changes:
reboot
You are now ready to install and configure Puppet.
Step 2: Install and Configure Puppet Server
Install Puppet server on master.hakase.io:
sudo yum -y install puppetserver
Configure the memory allocation for Puppet server to 1GB. Edit the configuration:
vim /etc/sysconfig/puppetserver
Set the following line:
JAVA_ARGS="-Xms1g -Xmx1g ...."
Save and exit. Now edit the ‘puppet.conf’ file:
cd /etc/puppetlabs/puppet
vim puppet.conf
Add the following configuration:
[master]
dns_alt_names=master.hakase.io,puppet
[main]
certname = master.hakase.io
server = master.hakase.io
environment = production
runinterval = 1h
Save and exit. Start the Puppet server and enable it on startup:
systemctl start puppetserver
systemctl enable puppetserver
Puppet server installation and configuration are now complete.

If you are using firewalld, allow the Puppet server port:
firewall-cmd --add-port=8140/tcp --permanent
firewall-cmd --reload

Step 3: Install and Configure Puppet Agent
Install Puppet agent on agent.hakase.io:
yum install -y puppet-agent
Edit the configuration file:
cd /etc/puppetlabs/puppet
vim puppet.conf
Add the following configuration:
[main]
certname = agent.hakase.io
server = master.hakase.io
environment = production
runinterval = 1h
Save and exit. Register the Puppet agent with the Puppet master:
/opt/puppetlabs/bin/puppet resource service puppet ensure=running enable=true
The agent is now registered. On the master, verify the certificate signing request:
/opt/puppetlabs/bin/puppet cert list
Sign the certificate:
/opt/puppetlabs/bin/puppet cert sign agent.hakase.io

The Puppet agent is now configured and the certificate is signed by the Puppet master.
Step 4: Verify Puppet Agent Configuration
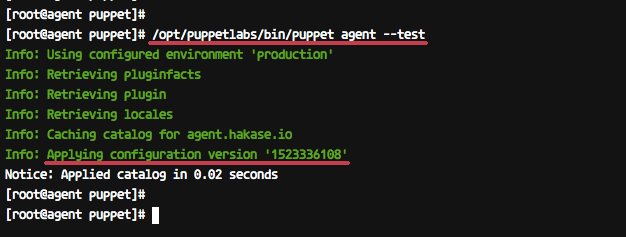
After the Puppet master’s certificate is signed, verify the configuration by running:
/opt/puppetlabs/bin/puppet agent --test
Ensure the process completes without errors.

Step 5: Create Your First Puppet Manifest
The installation and configuration of the Puppet master and agent are successful. Next, create a simple manifest to test the setup.
Create a manifest for installing the Apache HTTPD server. On the Puppet master server, navigate to the manifest directory:
cd /etc/puppetlabs/code/
cd environments/production/manifests
Create and edit the ‘site.pp’ file:
vim site.pp
Add the following configuration:
node 'agent.hakase.io' {
   package { 'httpd':
       ensure => "installed",
   }
   service { 'httpd':
       ensure => running,
       enable => true
   }
}
Save and exit. Run the following command on the Puppet agent:
/opt/puppetlabs/bin/puppet agent --test
This command fetches and applies the new manifest configuration.

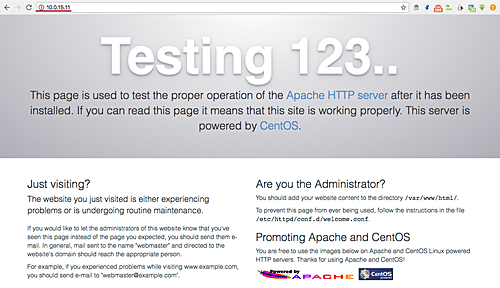
Open a web browser and enter the Puppet agent’s IP address:
http://10.0.15.11/
You will see the default HTTP page.

The HTTPD web server has been successfully installed using the Puppet manifest. Puppet Master and Agent on CentOS 7 are fully operational.
Reference
Frequently Asked Questions
What is Puppet?
Puppet is a configuration management tool that automates the delivery and operation of software while ensuring consistency across environments.
Can Puppet be used on Windows?
Yes, Puppet supports both Unix-like systems and Windows, making it highly versatile.
Why is time synchronization important between Master and Agent?
Consistent time synchronization between servers ensures accurate logging and smooth operation of services like Puppet, which rely on accurate timestamps for operations.
How do I verify Puppet Agent installation?
After installation, you can verify the agent configuration by running /opt/puppetlabs/bin/puppet agent --test, which tests the configuration and setup.